Build Your Chatbot Easily. This way.
Tutorials, guides, FAQs, and official info on every RAG feature. Can't find what you're looking for, try our contact form.
Getting Started
Discover the basics of creating your own AI chatbot with WebTalkBot in just a few simple steps. Learn how to quickly build a knowledge base from websites or PDF documents, apply essential configuration settings, and deploy your fully functional chatbot in few minutes—no coding required. Start engaging your users with accurate, context-aware responses today.
WebTalkBot helps you create AI-powered chatbots that can answer questions based on your specific content. Unlike typical chatbots that rely on pre-programmed responses or general knowledge, WebTalkBot uses Retrieval-Augmented Generation (RAG) technology to provide accurate answers sourced directly from your website or documents.
Getting Started with WebTalkBot
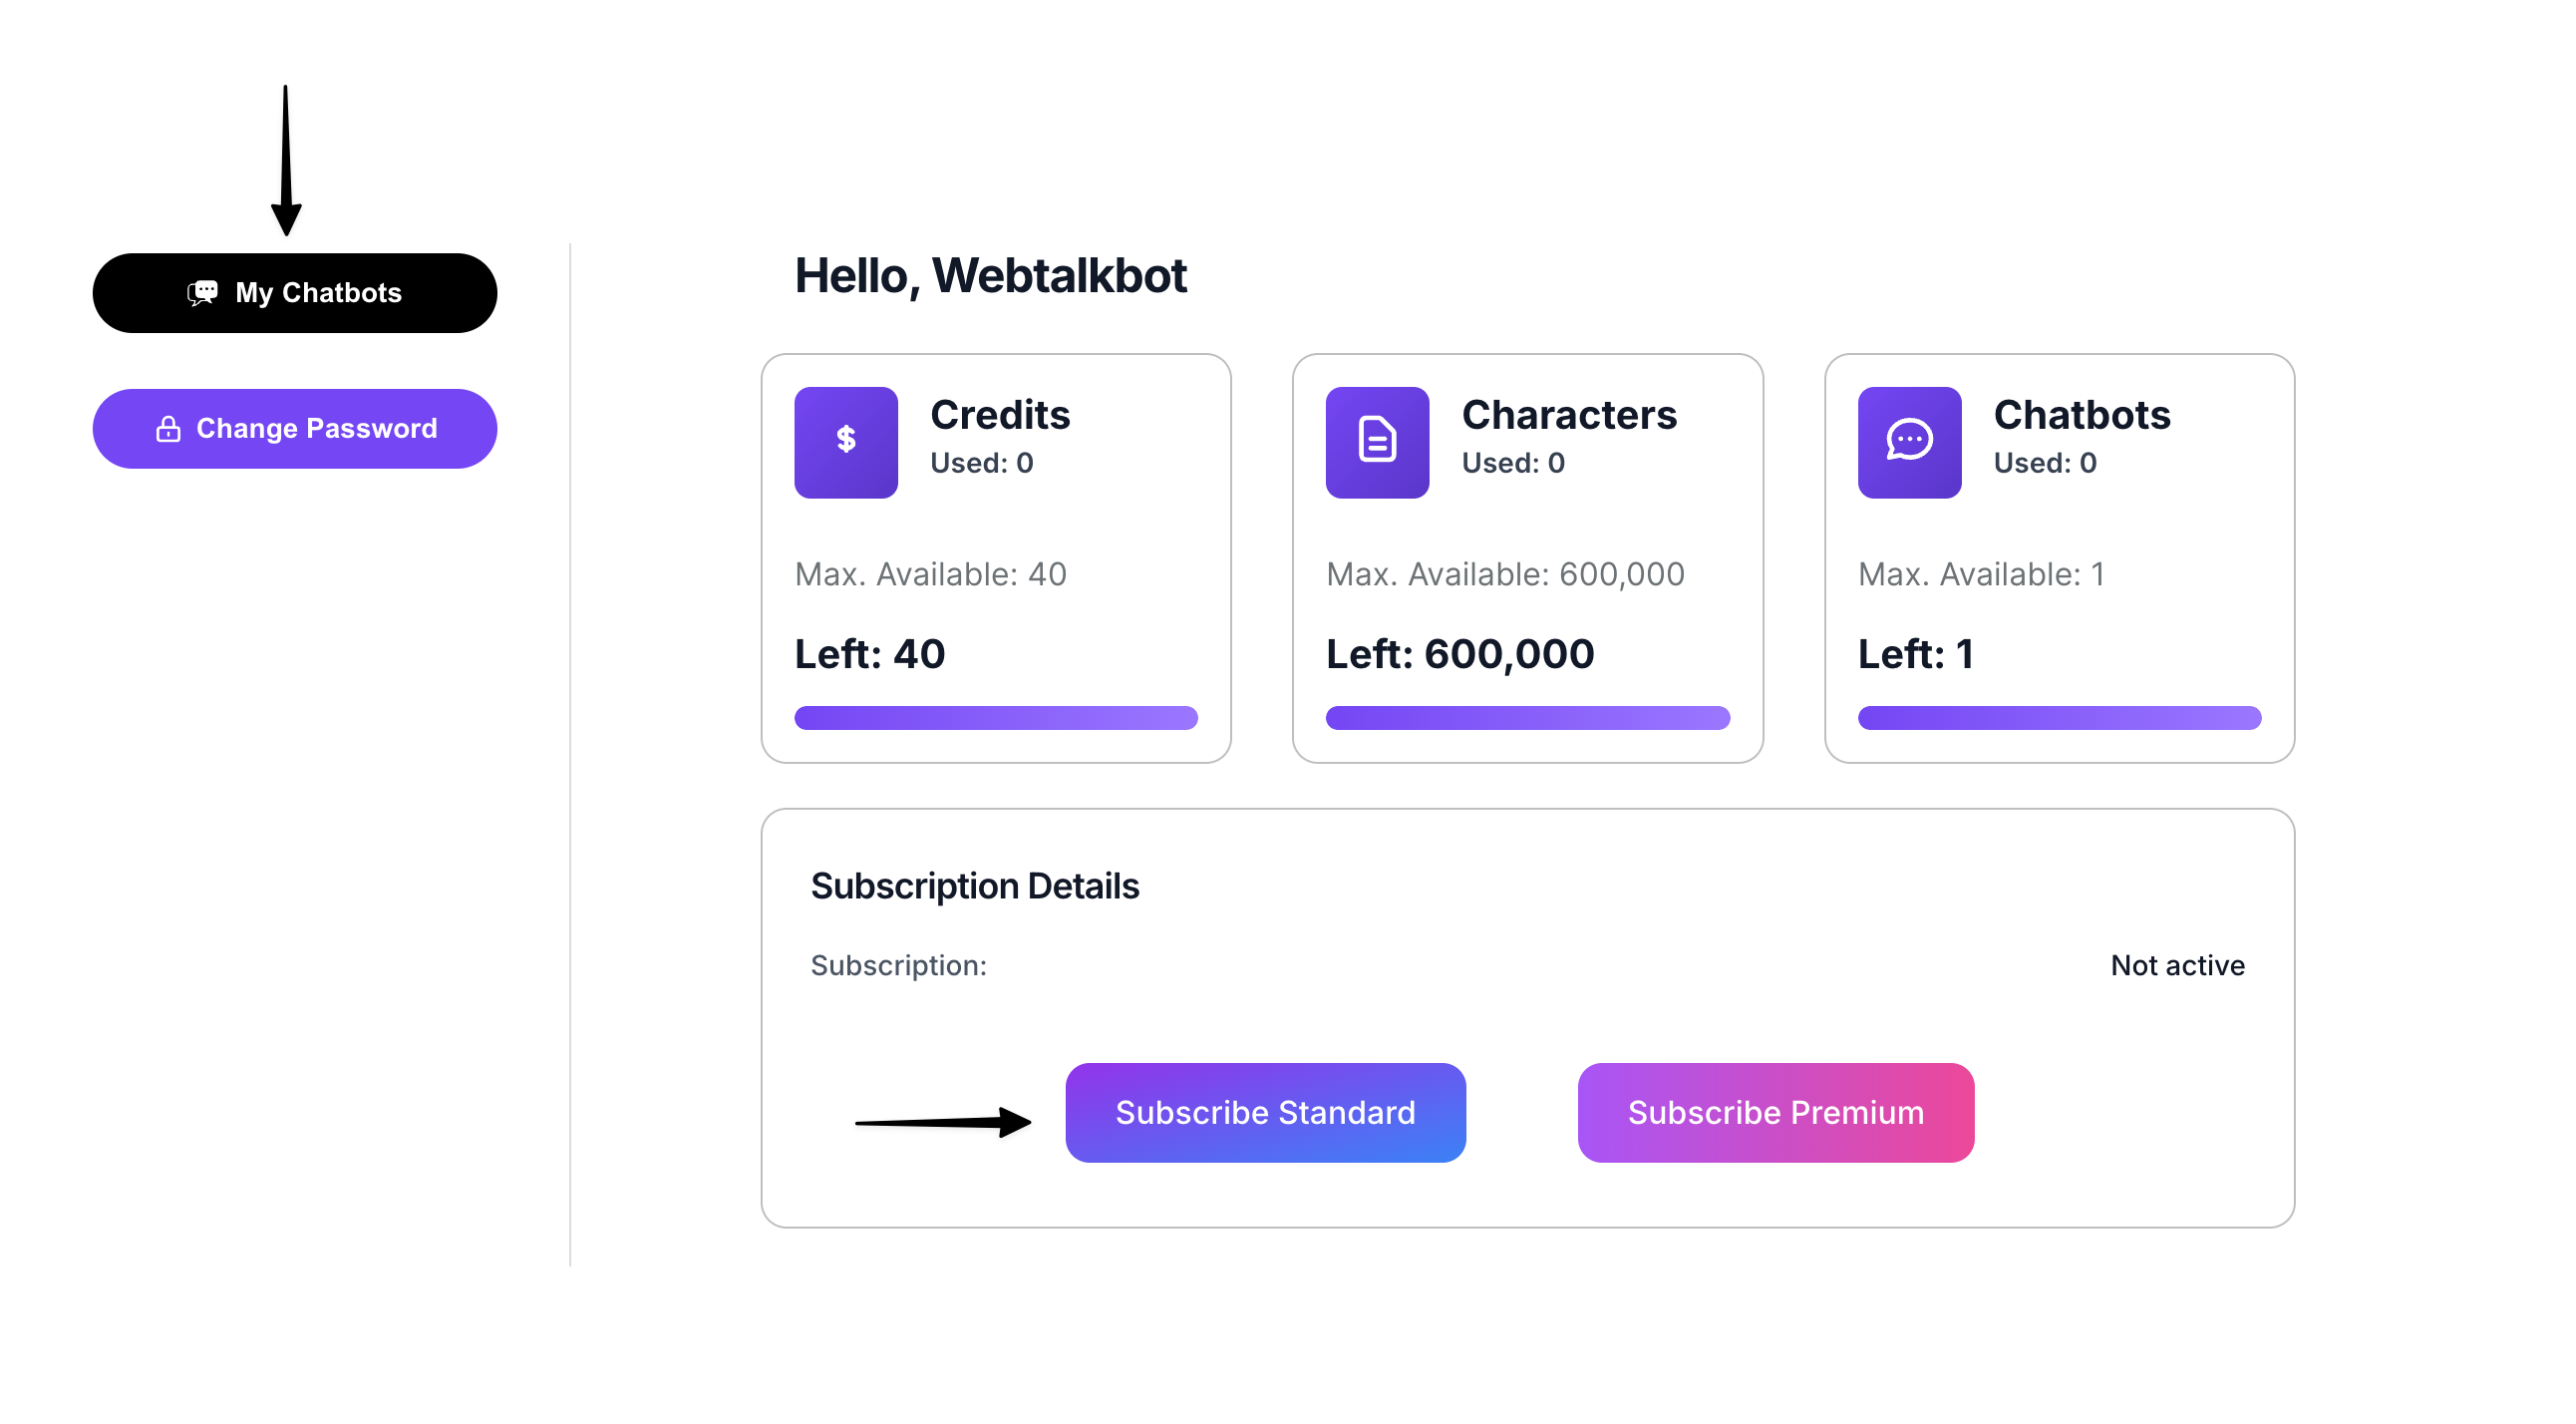
After registering, you'll see your dashboard with:
- Available credits for usage
- Character limits for your plan
- Number of chatbots you can create
- Subscription options (Standard, Premium)

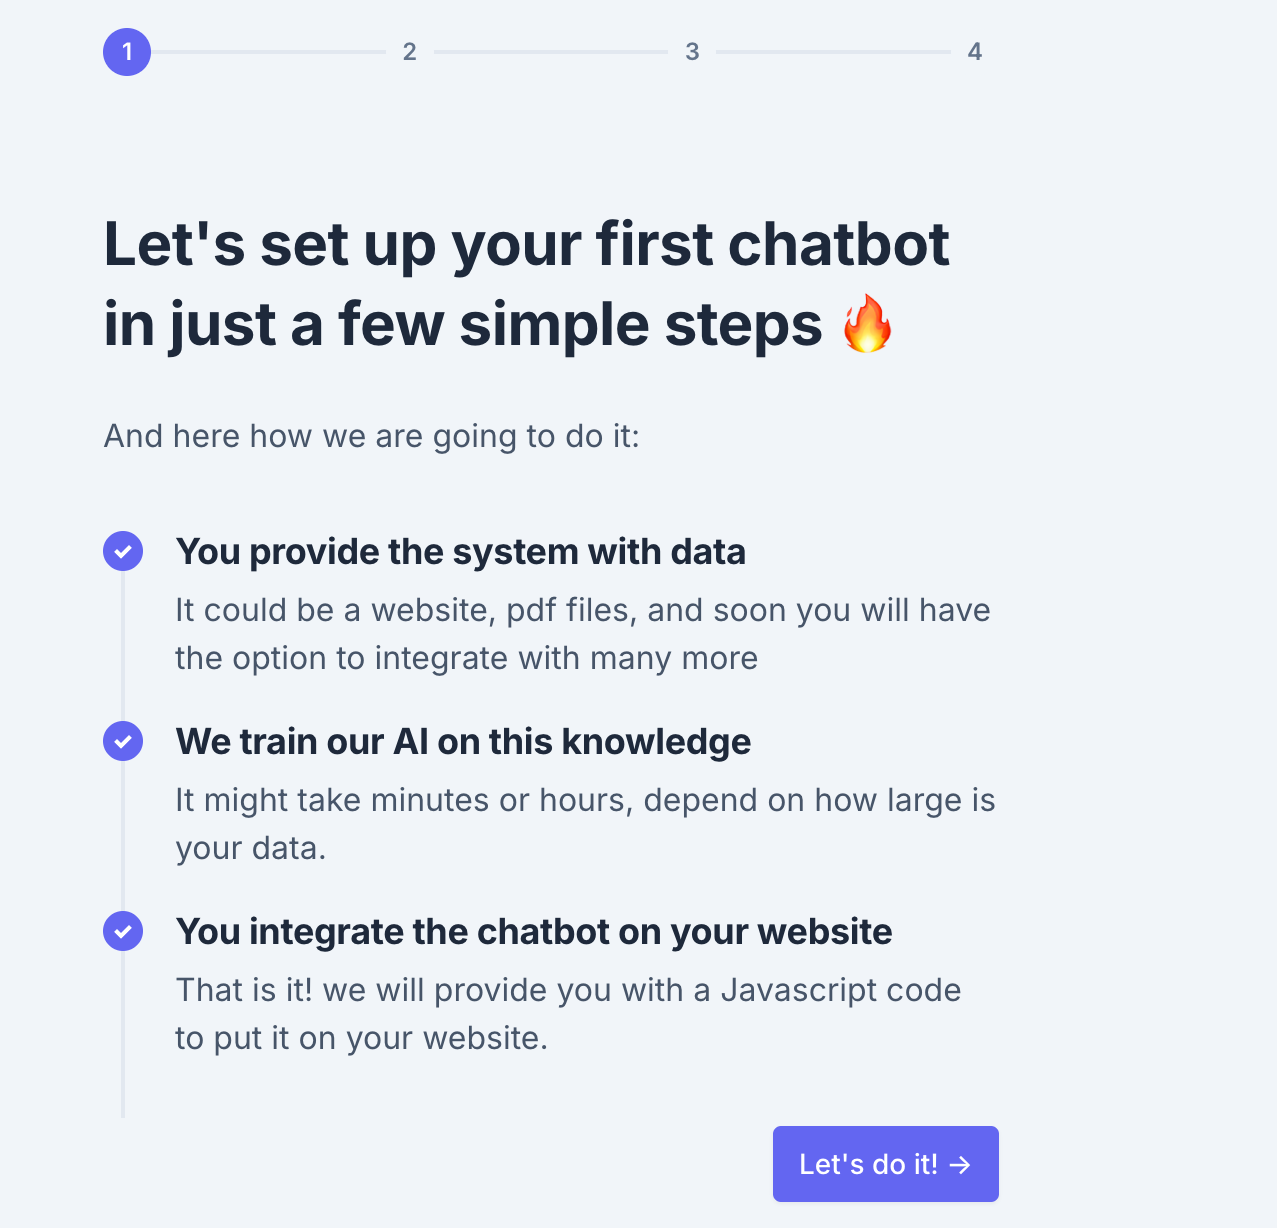
To create your first chatbot, simply click the "Create Chatbot" button from the "My Chatbots" screen. The wizard will guide you through selecting your knowledge source (website or PDF) and configuring your chatbot character.
With the free plan, you can try out the platform with limited credits and create one chatbot. For additional features and higher usage limits, you can upgrade to our Standard or Premium plans directly from your dashboard.
Create a Chatbot from Website Data in Simple Steps – Effortlessly Easy!
Our platform makes building an AI chatbot from website data a breeze! Designed for simplicity, you can create a custom chatbot from website content in just a few easy steps. Follow this user-friendly guide to set up your AI-powered chatbot from website with no hassle.
Get Started with a Single Click for Your Chatbot from Website Data
Log in and head to the "My chatbots" section. Click the "Create Chatbot +" button to begin crafting your chatbot from web data. It’s that simple to start!
Pick Your Website as the Data Source – Super Simple!
On the "Select your data source" page, choose the "Website" option to create a chatbot from website data. Our system will automatically crawl your site and extract the knowledge for your AI chatbot from website. You can always add more sources later to enhance your chatbot from web data.
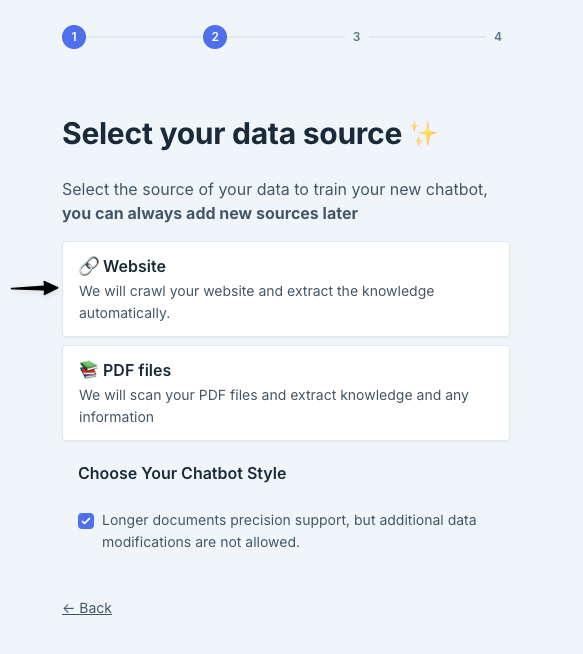
After selecting PDF files, you'll see the "Choose Your Chatbot Style" option:
Longer documents precision support, but additional data modifications are not allowed.This style setting optimizes your chatbot for handling longer PDF documents with greater precision, though it restricts certain modifications to the data once processed.
Enter Your Website Details – Quick and Customizable!
Type in the URL of your website (e.g., https://www.yourwebsite.com) to train your chatbot from web data.
Set the "Max. pages to crawl" to a value between 1 and 30, giving you control over how many pages we process for your chatbot from website data.
Click the "Crawl" button, and the system will list the crawled links with character counts (e.g., 11,222 characters for the FAQ page). Your AI-powered chatbot from website starts taking shape with ease!

Choose Your Chatbot’s Personality – Website Already Crawled!
After your website has been crawled (you’ll see a status bar indicating the process is complete), pick the personality of your chatbot from website data. On the "In the meanwhile, Let’s do some configurations" page, select:
- Wise & Strict: Ideal for an AI chatbot from website that sticks to your extracted data for accurate answers.
- More Randomness: Perfect for a custom chatbot from website with creative responses.
Choose what suits you best (e.g., "Wise & Strict" for precise replies), and click "Next Step" to move forward effortlessly.

Launch Your Chatbot – Done in a Snap!
Once complete, you’ll see a "That is it!" message with an "Open your bot" button. Click to launch your chatbot from web data!

Your new AI chatbot from the website will appear automatically opened and you'll also find it in the "My chatbots" section with the default name "My first chatbot" (along with a timestamp), ready for integration. Note: "My first chatbot" is the default name for every chatbot, so don’t worry—you can easily change it in the settings!
Tip:
Click "Home" anytime to see all your created chatbots.

Notification of Processing:
After crawling, you’ll get a confirmation like "Website Processing Was Successful" with the total characters processed (e.g., 10,7319 characters). This means your AI-powered chatbot from website is ready to go – all with minimal effort!

Create a Chatbot from PDF Data in Simple Steps – Effortlessly Easy!
Our platform makes building an AI chatbot from PDF documents incredibly simple! Follow this user-friendly guide to create a custom chatbot using your PDF files in just a few steps.
Step 1: Select PDF Files as Your Data Source
Start by selecting "PDF files" as the data source for your chatbot. On the "Select your data source" page, choose the "PDF files" option. Our system will scan your PDFs and extract knowledge to train your chatbot. You can always add more sources later!
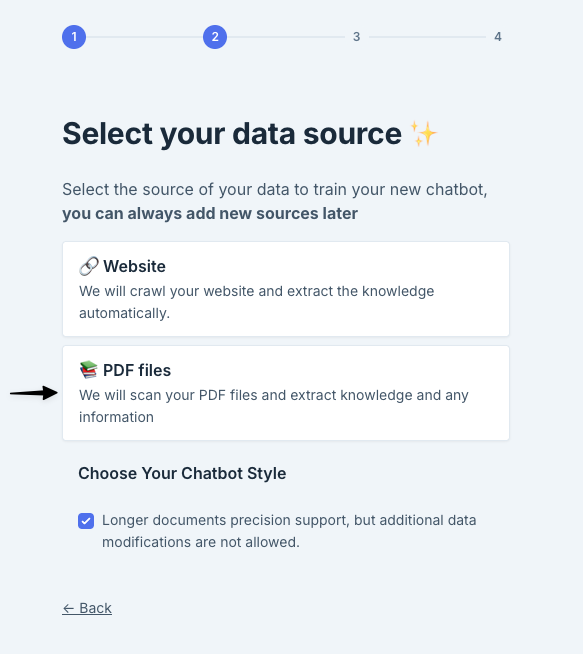
After selecting PDF files, you'll see the "Choose Your Chatbot Style" option:
Longer documents precision support, but additional data modifications are not allowed.
This style setting optimizes your chatbot for handling longer PDF documents with greater precision, though it restricts certain modifications to the data once processed.
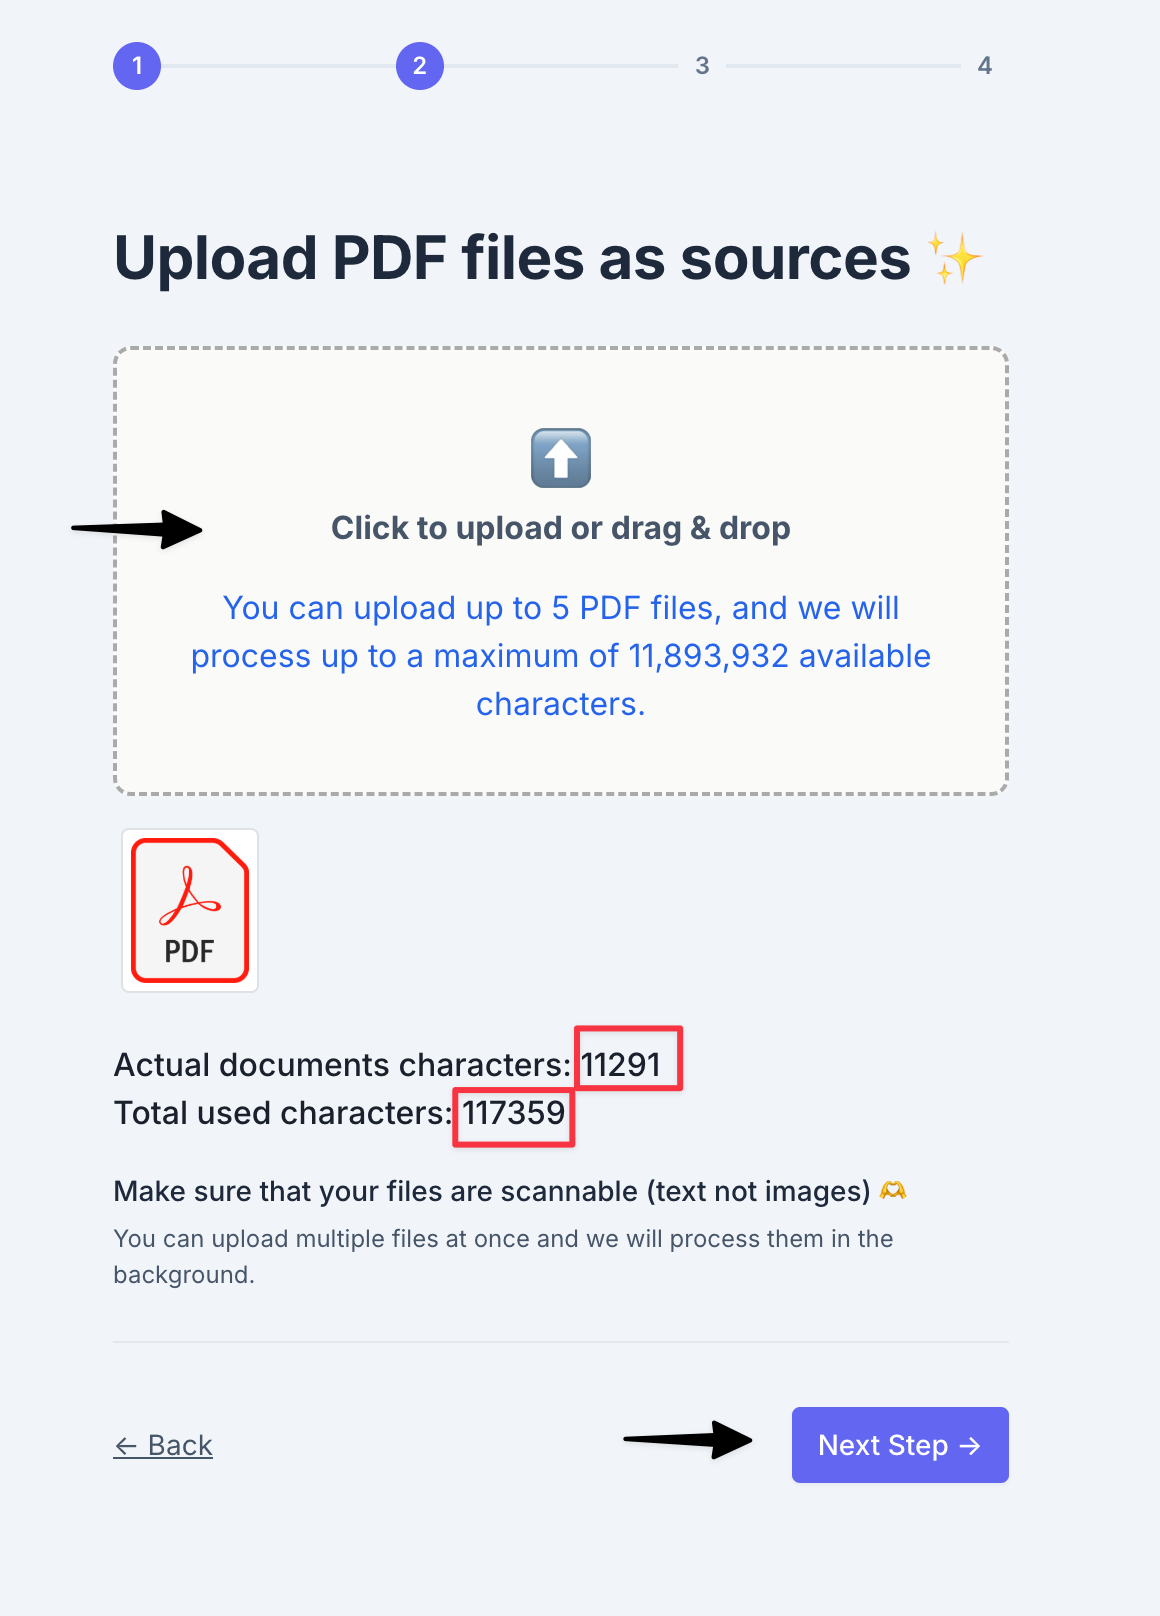
Step 2: Upload Your PDF Files
On the "Upload PDF files as sources" page, click to upload or drag and drop your PDF files. You can upload up to 5 PDF files, with a maximum available characters. The system will display the total characters processed (e.g., 11,291 characters). Make sure your files are scannable (text, not images) for accurate extraction. Click "Next Step" to proceed.
Step 3: Configure Your Chatbot’s Personality
While your PDFs are being processed, you can configure your chatbot’s personality on the "In the meanwhile, Let’s do some configurations" page. Choose between two options:
- Wise & Strict: The chatbot will only answer questions based on the knowledge extracted from your PDFs, ensuring precise responses.
- More Randomness: The chatbot will provide more creative responses, with greater flexibility in its answers.
Select your preferred option (e.g., "Wise & Strict" for accuracy) and click "Next Step" to continue.

Step 4: Launch Your Chatbot
Once your PDFs are processed, you’ll see a "That is it!" message with an "Open your bot" button. Click to launch your chatbot!

You’ll also receive a confirmation like "PDF Processing Was Successful" with the total characters processed (e.g., 11,291 characters).

Step 5: Share or Embed Your Chatbot

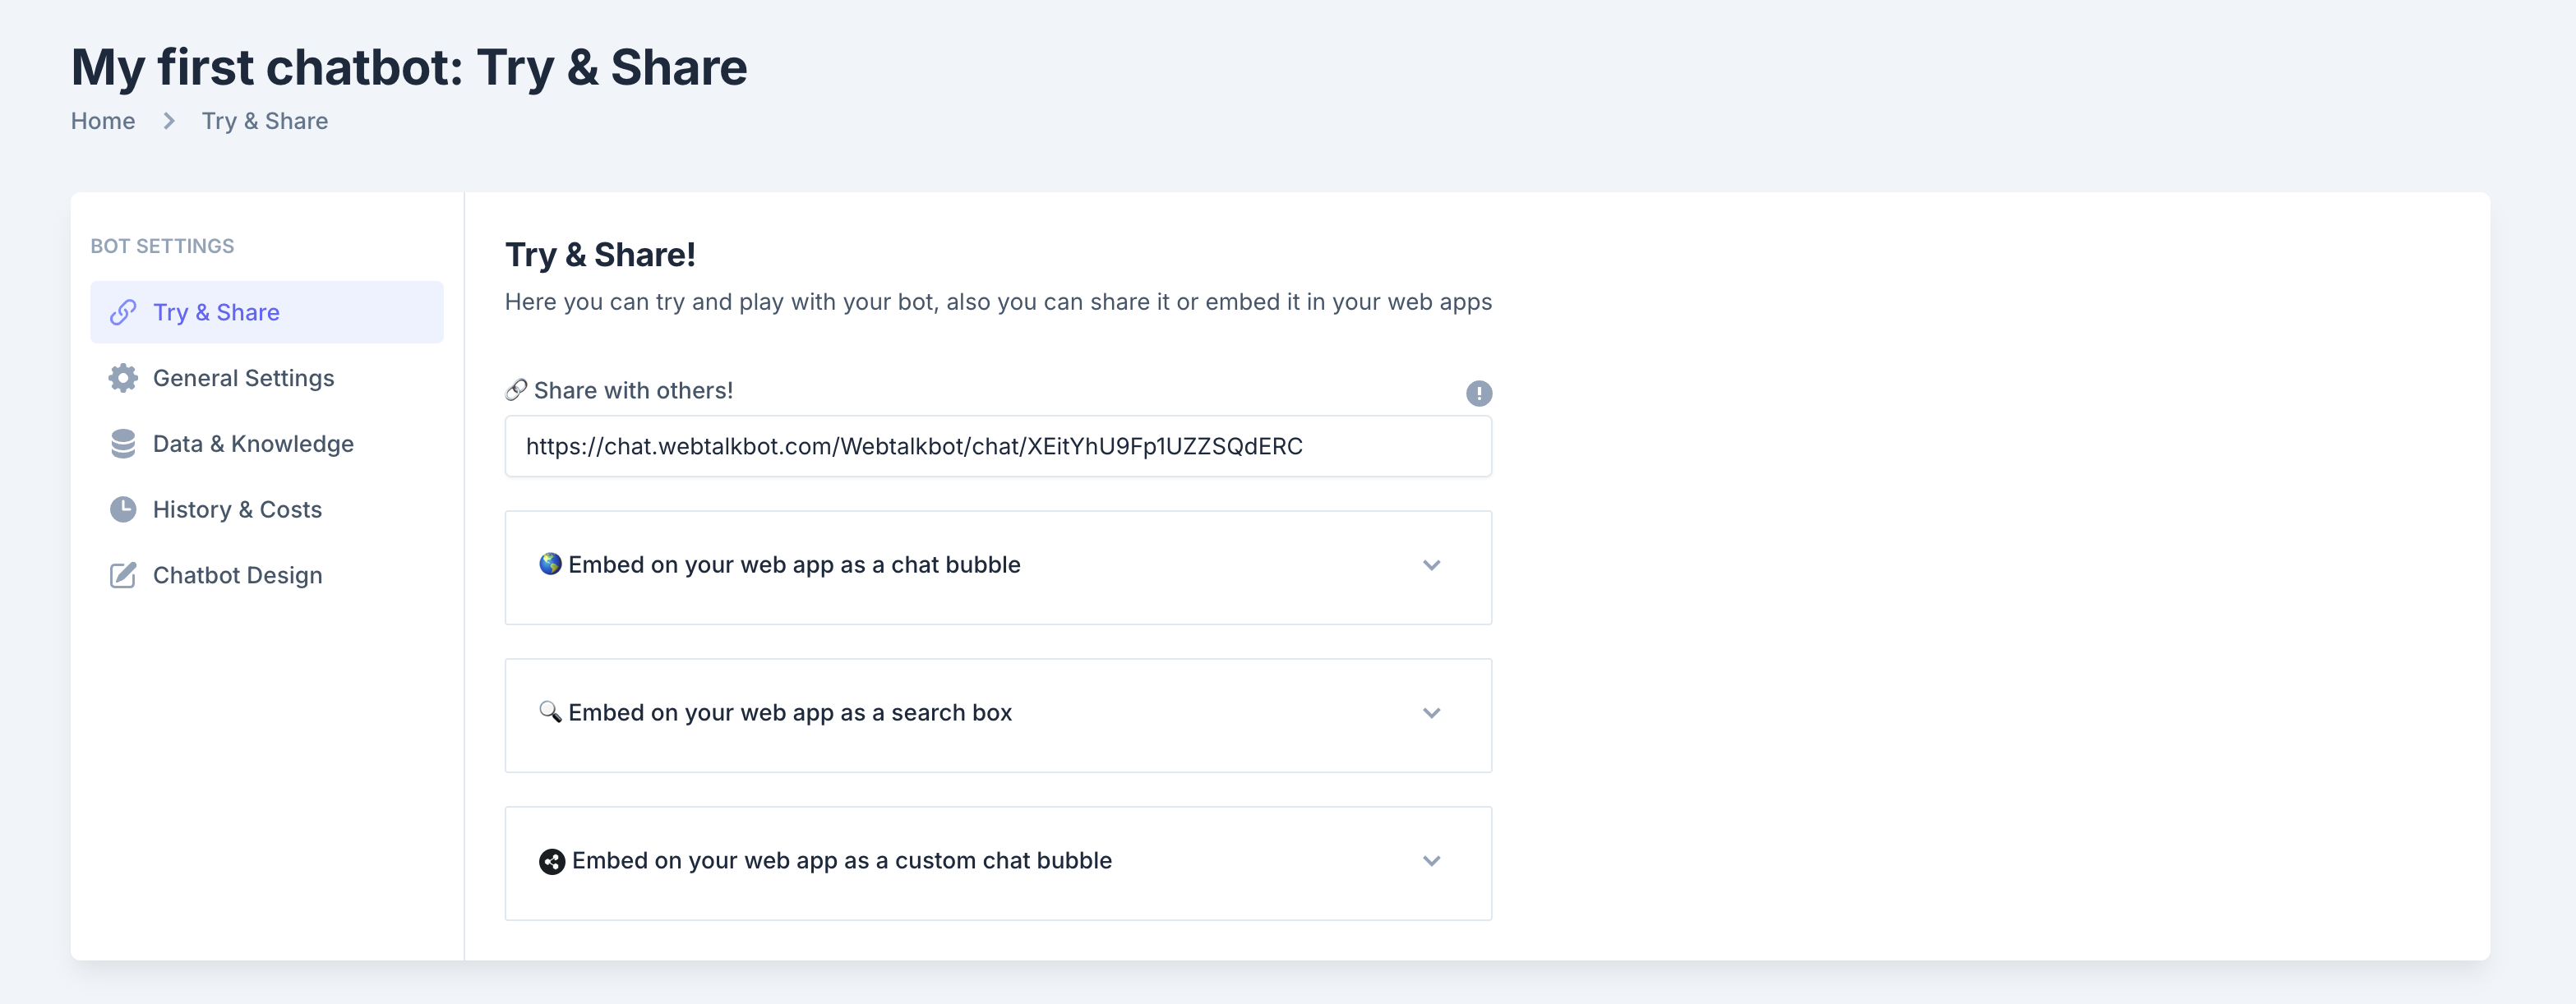
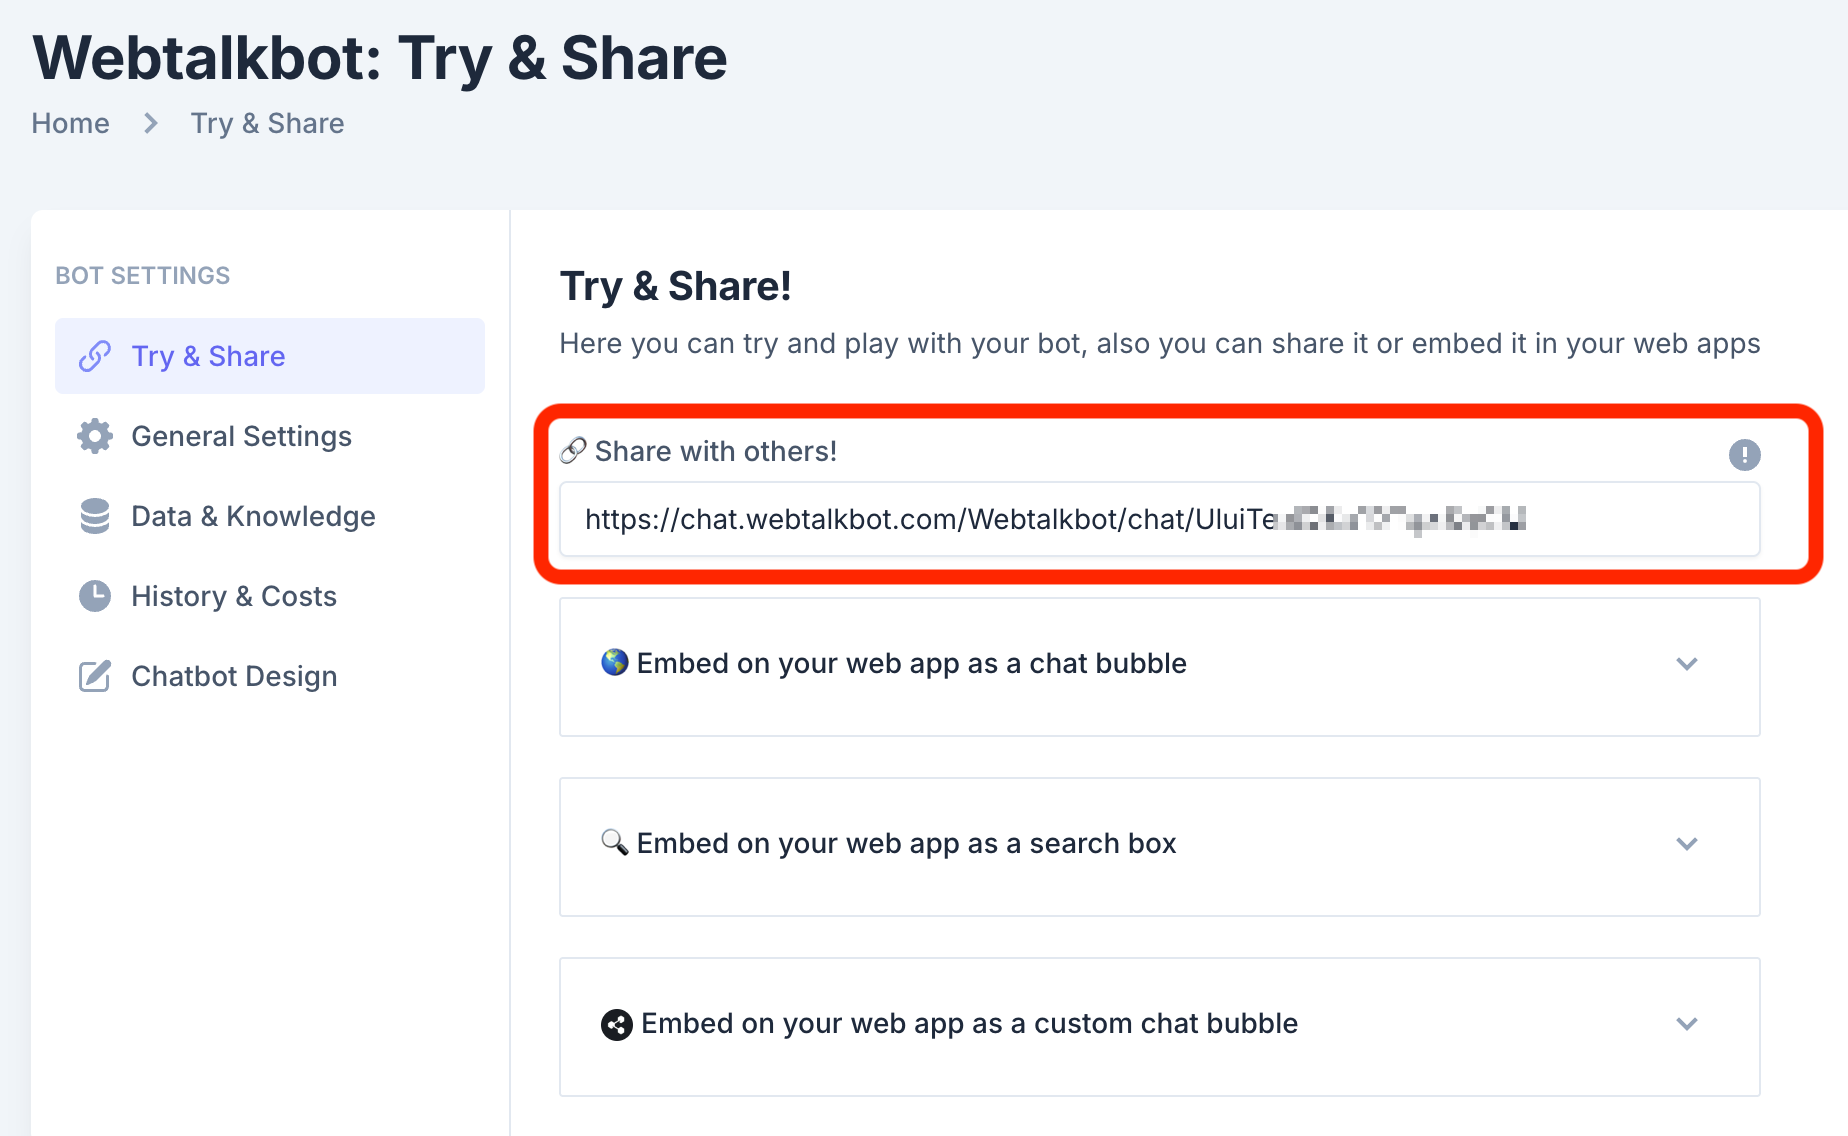
Your chatbot, named "My first chatbot: Try & Share," will be listed in the "My chatbots" section. On the "Try & Share" page, you can test your chatbot, share it with others via a link (e.g., https://chat.webtalkbot.com/...), or embed it on your website using options like a chat bubble, search box, or custom chat bubble. Customize its name or settings as needed!
Tip:
Click "Home" to view all your created chatbots or adjust settings like the chatbot’s name and integration options.

General Settings
In the General Settings section, you can define the foundational details of your chatbot.

- Name: Set a descriptive name for your chatbot. For example, in the screenshot, the name is set to
Webtalkbot. Enter your desired name in the Name field. - Bot ID: This is a unique identifier automatically generated by the platform (e.g.,
972c1d90-50f8-43a6-9b94-2230af1b7791in the screenshot). You cannot edit this field, but you can use it for API integrations or troubleshooting. - LLM Model: Select the Large Language Model (LLM) for your chatbot. In the screenshot, the model is set to
Gemini 2.0 Flash (1 credit). Use the dropdown menu to choose the model that best suits your needs, considering factors like performance, cost, and credit usage. - Local Language: Choose the primary language for your chatbot’s responses. The screenshot shows English as the selected language. Use the dropdown menu to select your preferred language.

If you want your chatbot to operate on Telegram, you'll need to provide a Telegram bot token to enable this integration.
Telegram Bot Token:
Obtain a bot token from BotFather on Telegram. The token in the screenshot is masked (e.g., ************) for security.
Enter your Telegram bot token in the Telegram Bot Token field on the configuration screen.
Telegram Bot Activation:
Toggle the Telegram Bot switch to enable Telegram integration. In the screenshot, this is shown as disabled (set to off). Turn it on to activate this feature.

Zapier allows you to connect your chatbot with other apps for automation.
Zapier Webhook URL:
Generate a webhook URL from Zapier and paste it here.
If you’re using Zapier, provide the webhook URL in the Zapier Webhook URL field. In the screenshot, this field is empty.
Zapier Integration:
Toggle the Zapier Integration switch to enable this feature. In the screenshot, this is disabled (set to off). Turn it on if you want to activate Zapier integration.
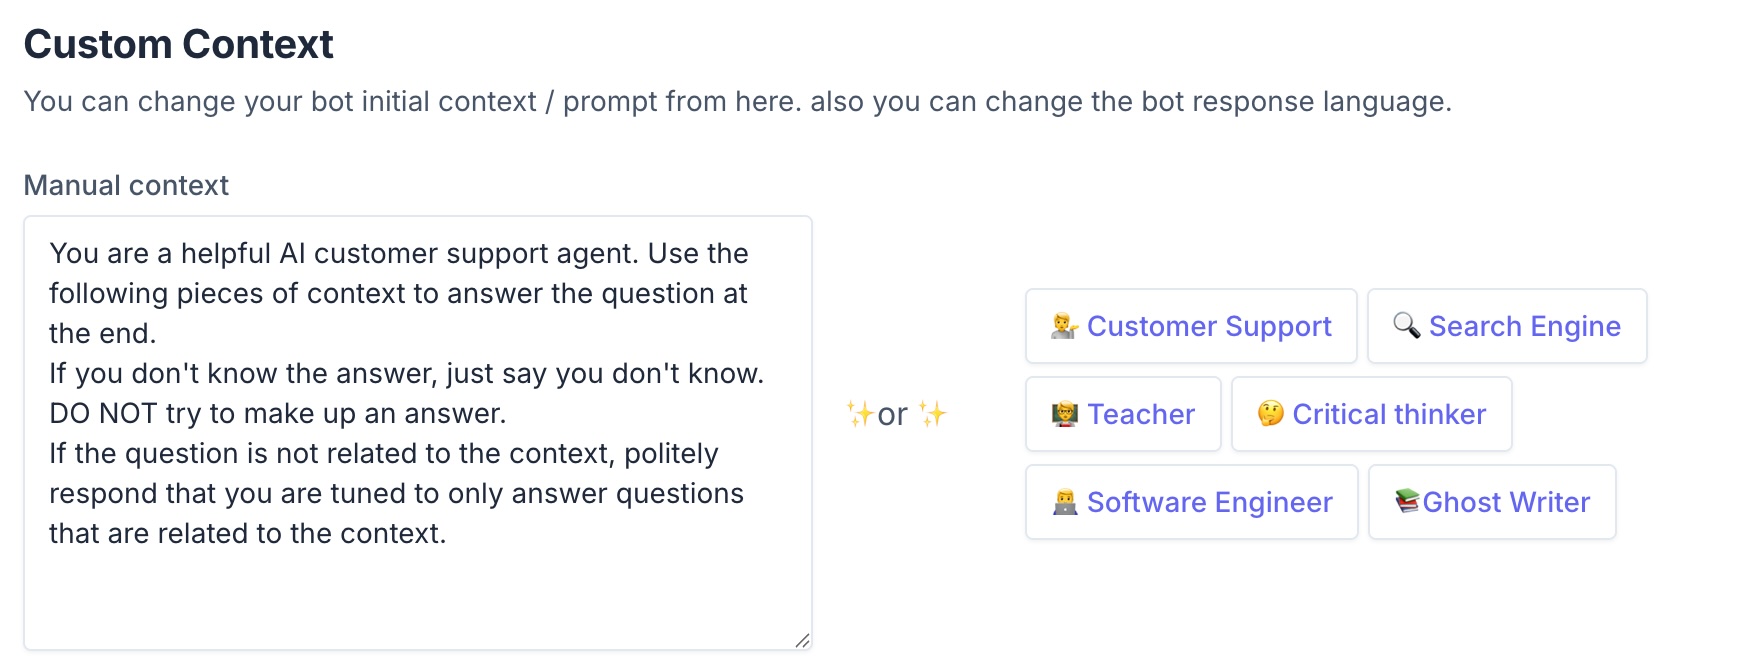
The Custom Context section is critical for a RAG chatbot, as it defines the knowledge base or behavior of the chatbot.
Manual Context:
In the Manual Context field, provide a prompt that sets the tone, role, or knowledge domain for your chatbot. The screenshot shows the following prompt:
This prompt configures the chatbot to act as a customer support agent, using provided context to answer questions. It also includes instructions for handling unknown or unrelated questions.
Write a similar prompt tailored to your use case. For example, if your chatbot is for technical support, you might write:
YOU ARE A TECHNICAL SUPPORT AGENT FOR A SOFTWARE COMPANY. USE THE FOLLOWING PIECES OF CONTEXT TO ANSWER QUESTIONS ABOUT OUR PRODUCTS. IF YOU DON'T KNOW THE ANSWER, SAY SO. DO NOT MAKE UP INFORMATION.
Role Selection:
Below the Manual Context field, you can select predefined roles to further customize the chatbot’s behavior. The screenshot shows options like:
- Customer Support
- Search Engine
- Teacher
- Critical Thinker
- Software Engineer
- Ghost Writer
Click on a role to append it to your context. For example, selecting Customer Support aligns with the prompt in the screenshot.
Once configured, your chatbot will use the defined context and role to provide tailored responses.

The Temperature setting controls the creativity of the chatbot’s responses.
Temperature:
The slider ranges from Reserved (0) to Creative (1). In the screenshot, the temperature is set to the minimum (fully Reserved).
For a RAG chatbot, a lower temperature (closer to 0) is recommended to ensure factual and context-based responses. Adjust the slider based on your preference:
- Reserved (0): More deterministic, factual responses.
- Creative (1): More creative, potentially less accurate responses.
If you need to remove the chatbot and all associated data:
Deletion Process:
Click the red Delete button at the bottom of the screen.
Confirm the deletion when prompted. Note that this action is irreversible and will delete all data associated with the bot.

Deployment
You can share your chatbot with others by providing them with a direct link to interact with it.
Sharing Process:
In the Try & Share section, locate the Share with others! field.
Copy the URL provided in this field. In the screenshot, the URL is:
https://chat.webtalkbot.com/Webtalkbot/chat/U1uTeuQS1u********
Share this URL with others via email, messaging apps, or any other platform. Users can access the chatbot directly by clicking the link.
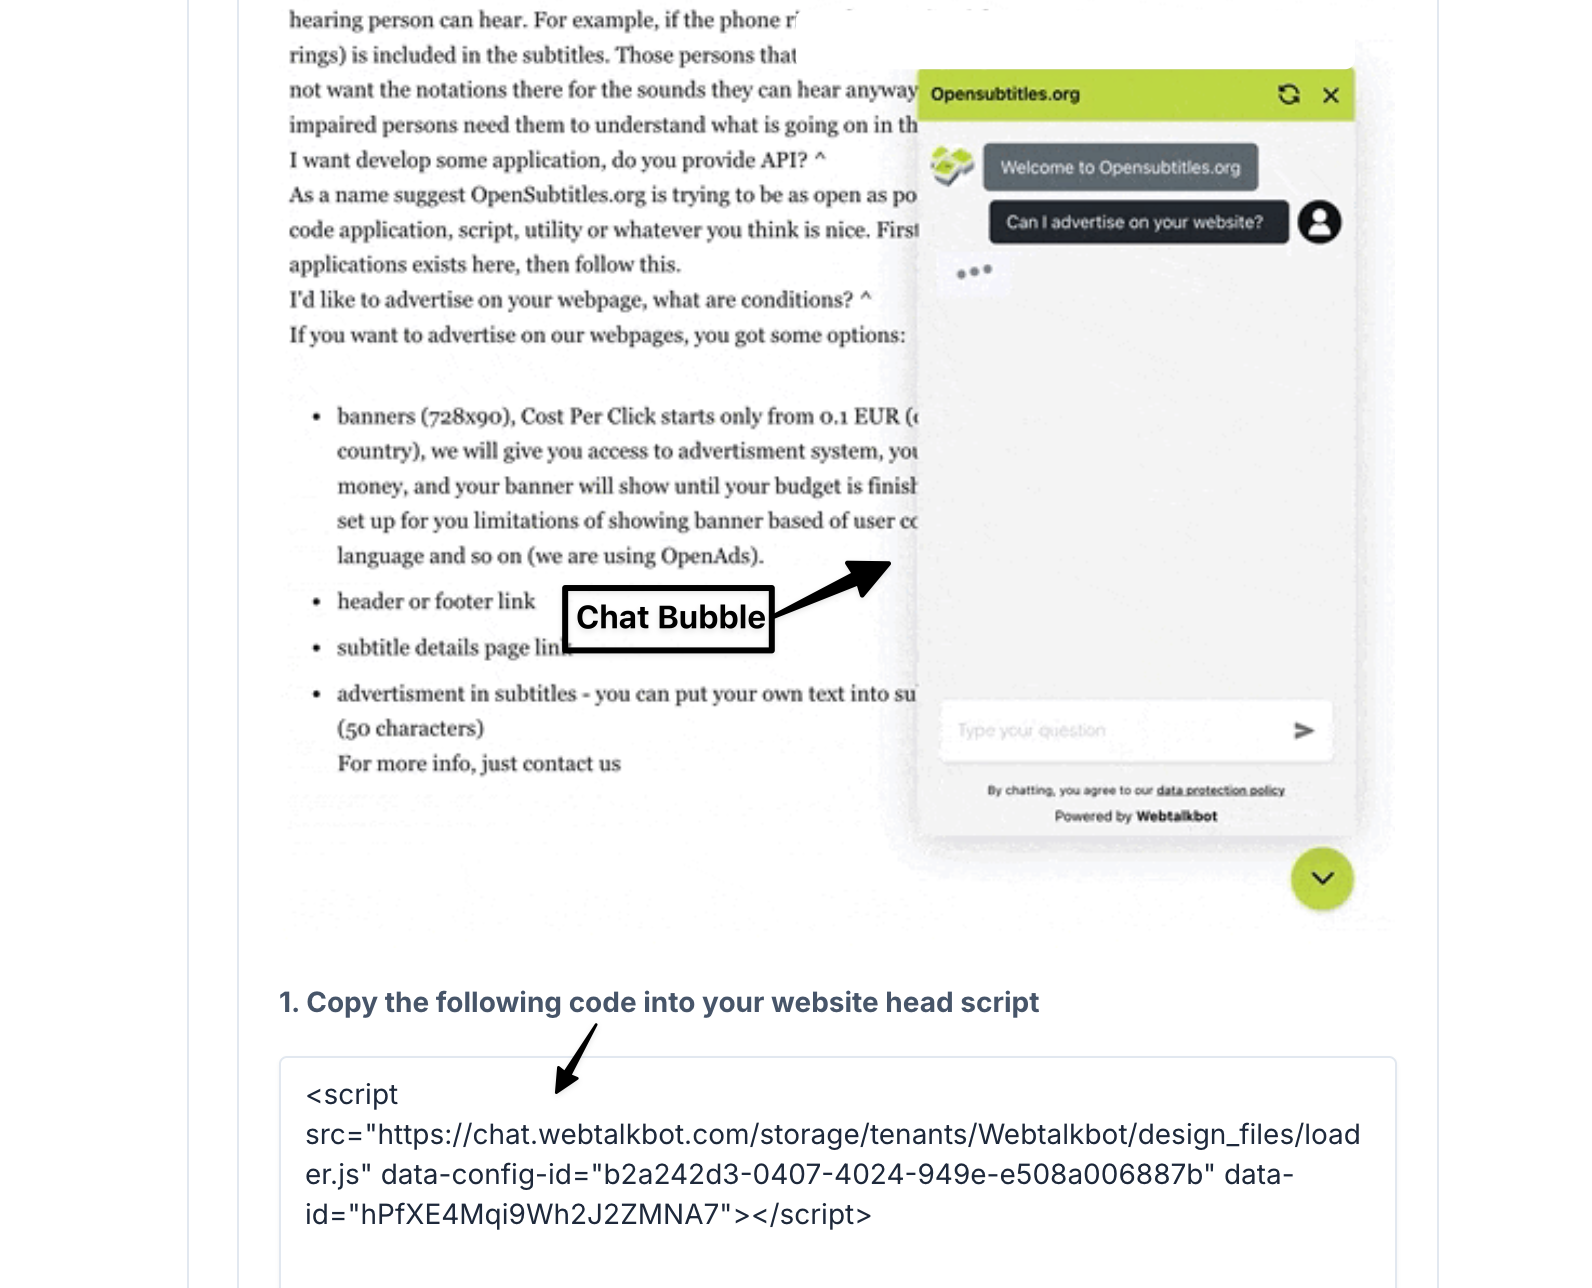
- Paste this code into the <head> or <footer> section of your website’s HTML file.
- Save the changes to your website. The chatbot will now appear as a chat bubble on your site.
- Once embedded, your website visitors can interact with the chatbot directly through the chat bubble, enhancing user engagement.
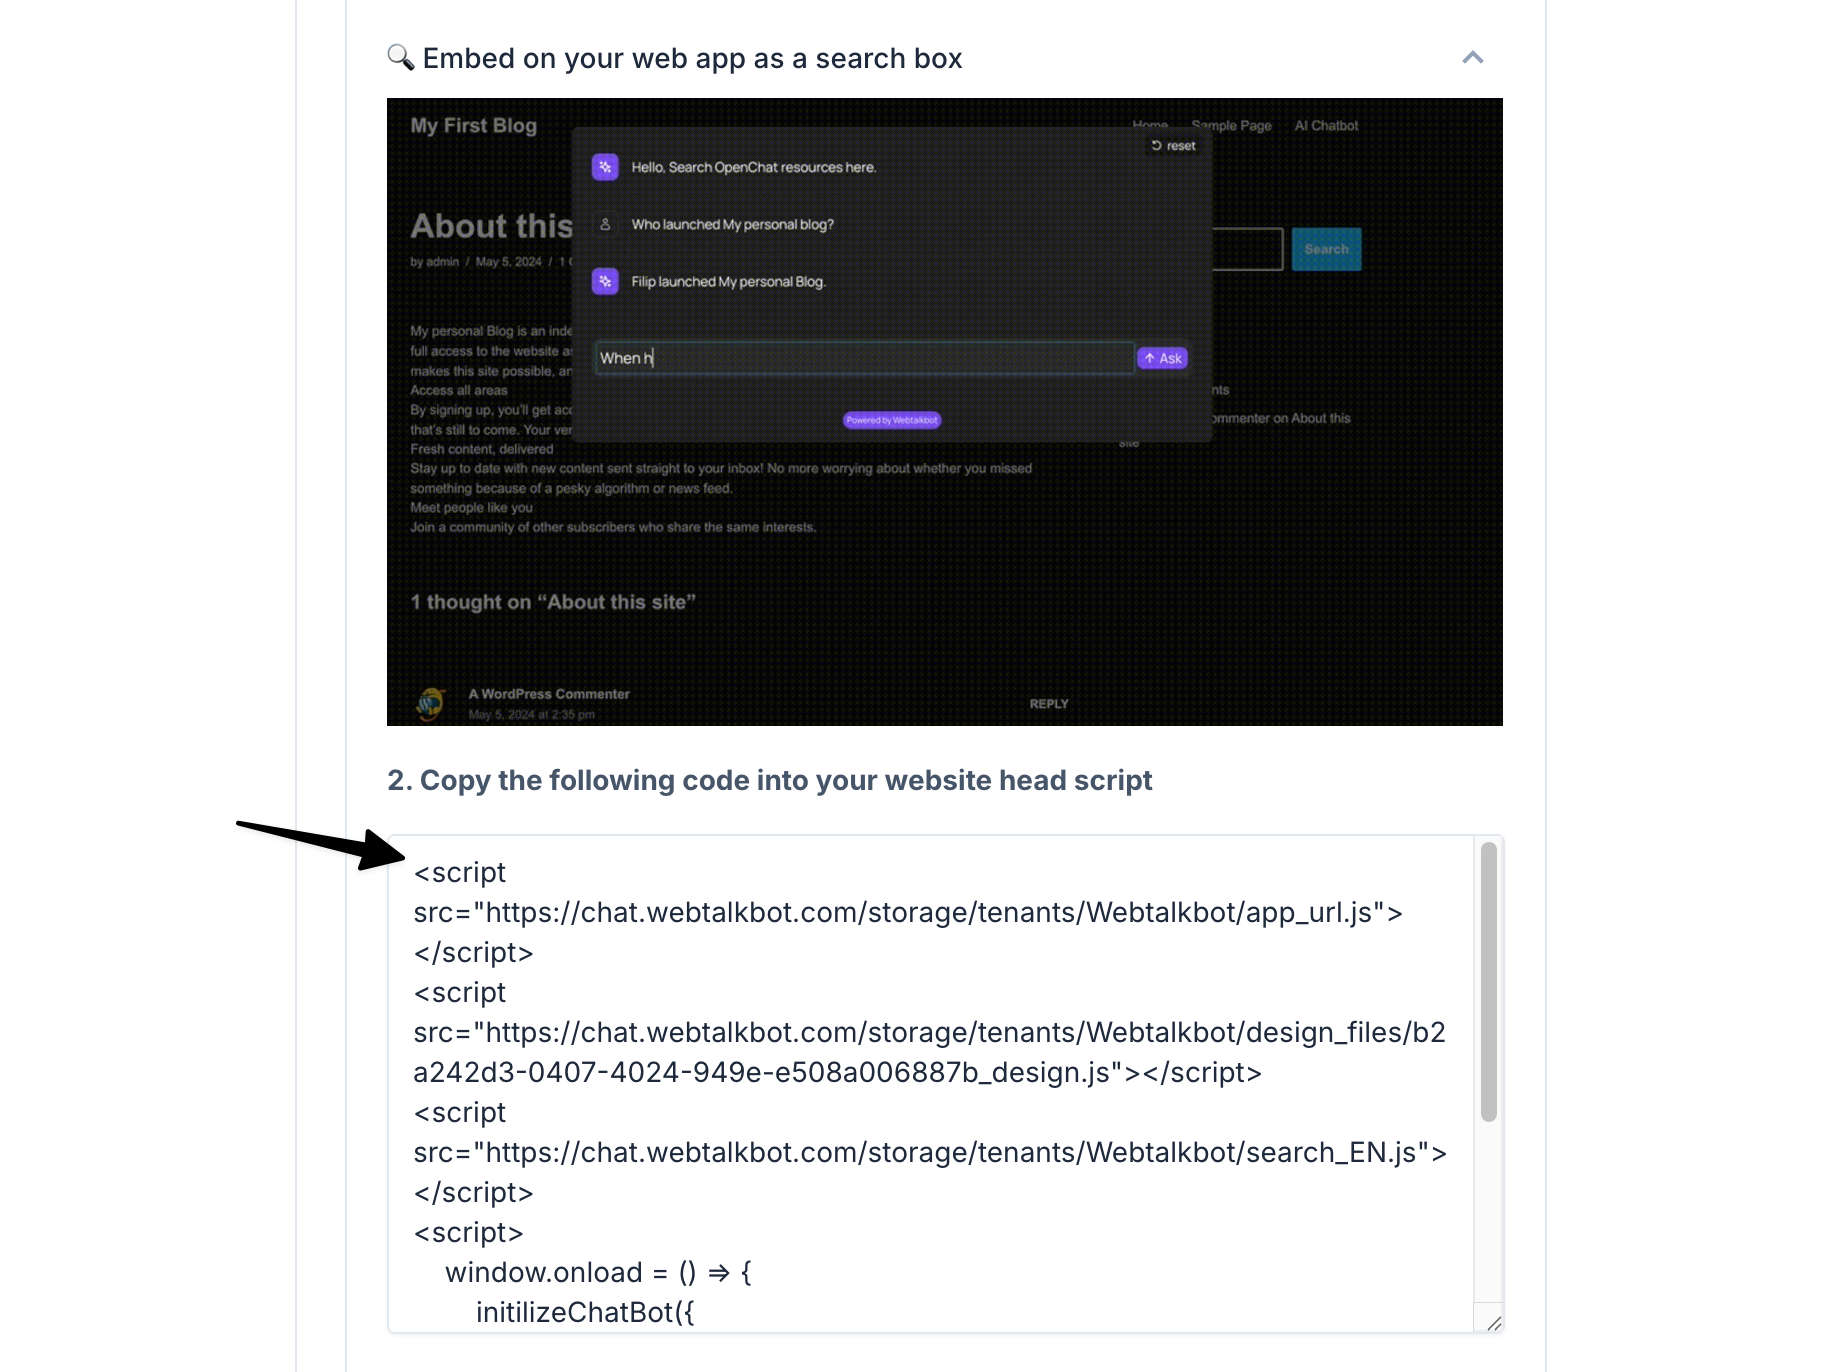
- Paste this code into the <head> or <footer> section of your website’s HTML file.
- Save the changes to your website. The chatbot will now appear as a search box on your site.
- Once embedded, your website visitors can interact with the chatbot directly through the chat bubble, enhancing user engagement.
Note: If you want to use a search box, you must set an identifier id in the html element that matches the initiatorId, for example: initiatorId:"search-box", then you must set up the div element as follows: <div id="search-box">
If you're interested in a custom chat bubble interface (e.g., using multiple chatbots in one chat bubble according to preferences, etc.), contact us through the contact form.
Data & Knowledge
The Data & Knowledge section in Webtalkbot allows you to manage the data sources that your chatbot uses to generate responses. You can add new data sources, view existing ones, and delete them if permitted. The data sources can be websites or PDF files, which the system will process to extract knowledge for your chatbot.
You can add new data sources at any time by clicking the Add new data source button, provided your chatbot is not set to an immutable data source.
If your chatbot has an immutable data source, the Add new data source button will be disabled, and you will not be able to add new data.
Adding a New Data Source:
To add a new data source for your chatbot to train on, follow these steps:
Navigate to Data & Knowledge:
From the Webtalkbot dashboard, go to Home > Data & Knowledge.
Initiate Adding a New Data Source:
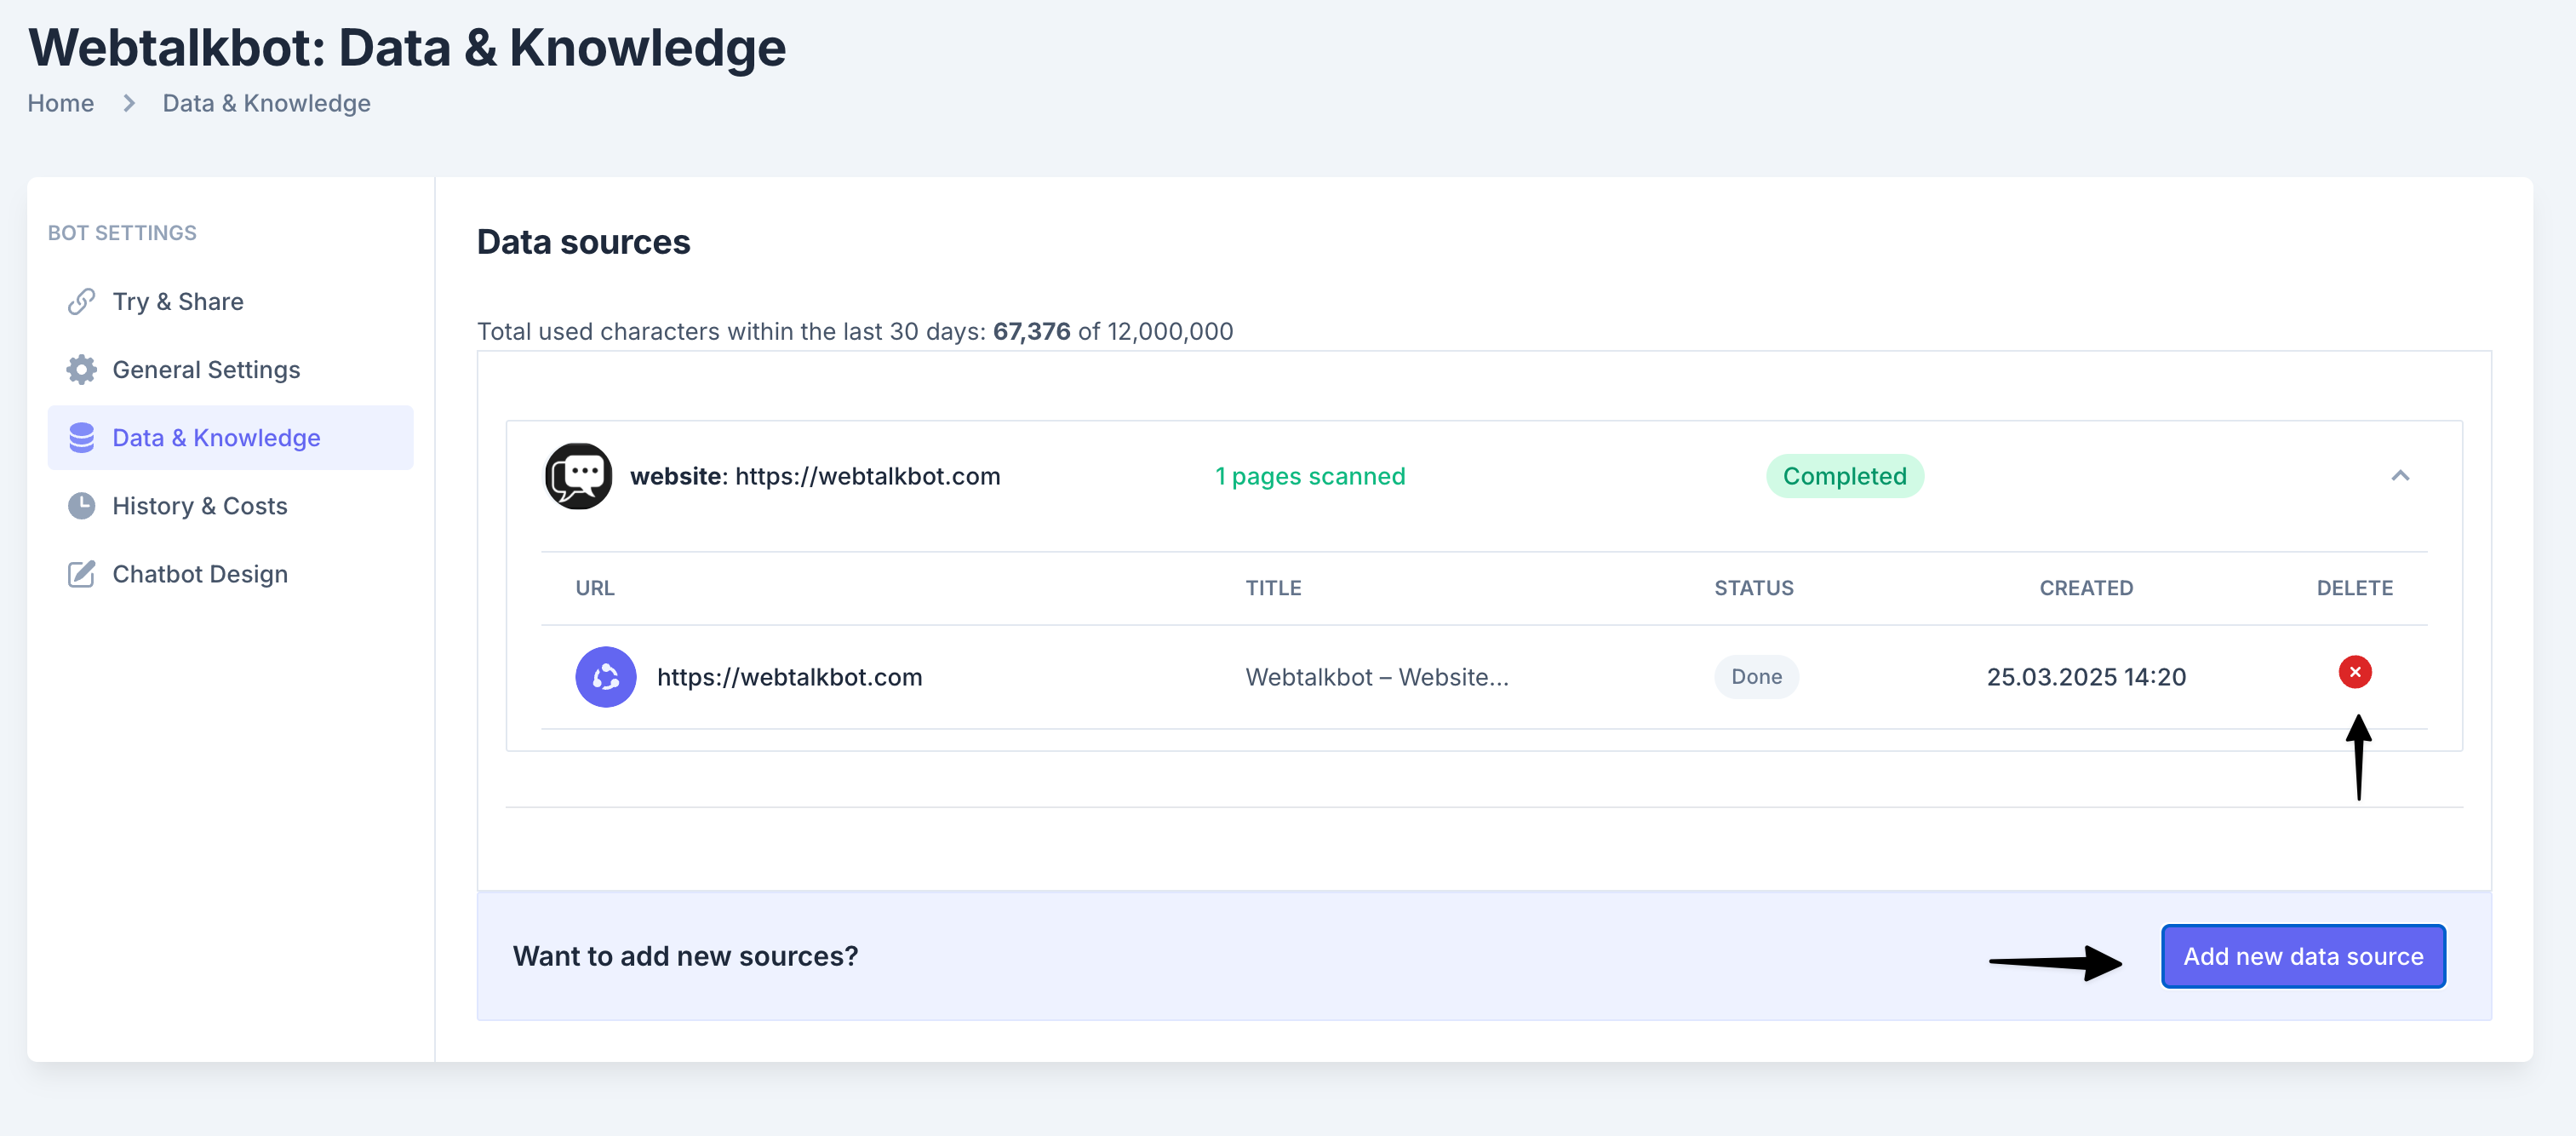
At the bottom of the "Data sources" section, click the Add new data source button .
Select Your Data Source Type:
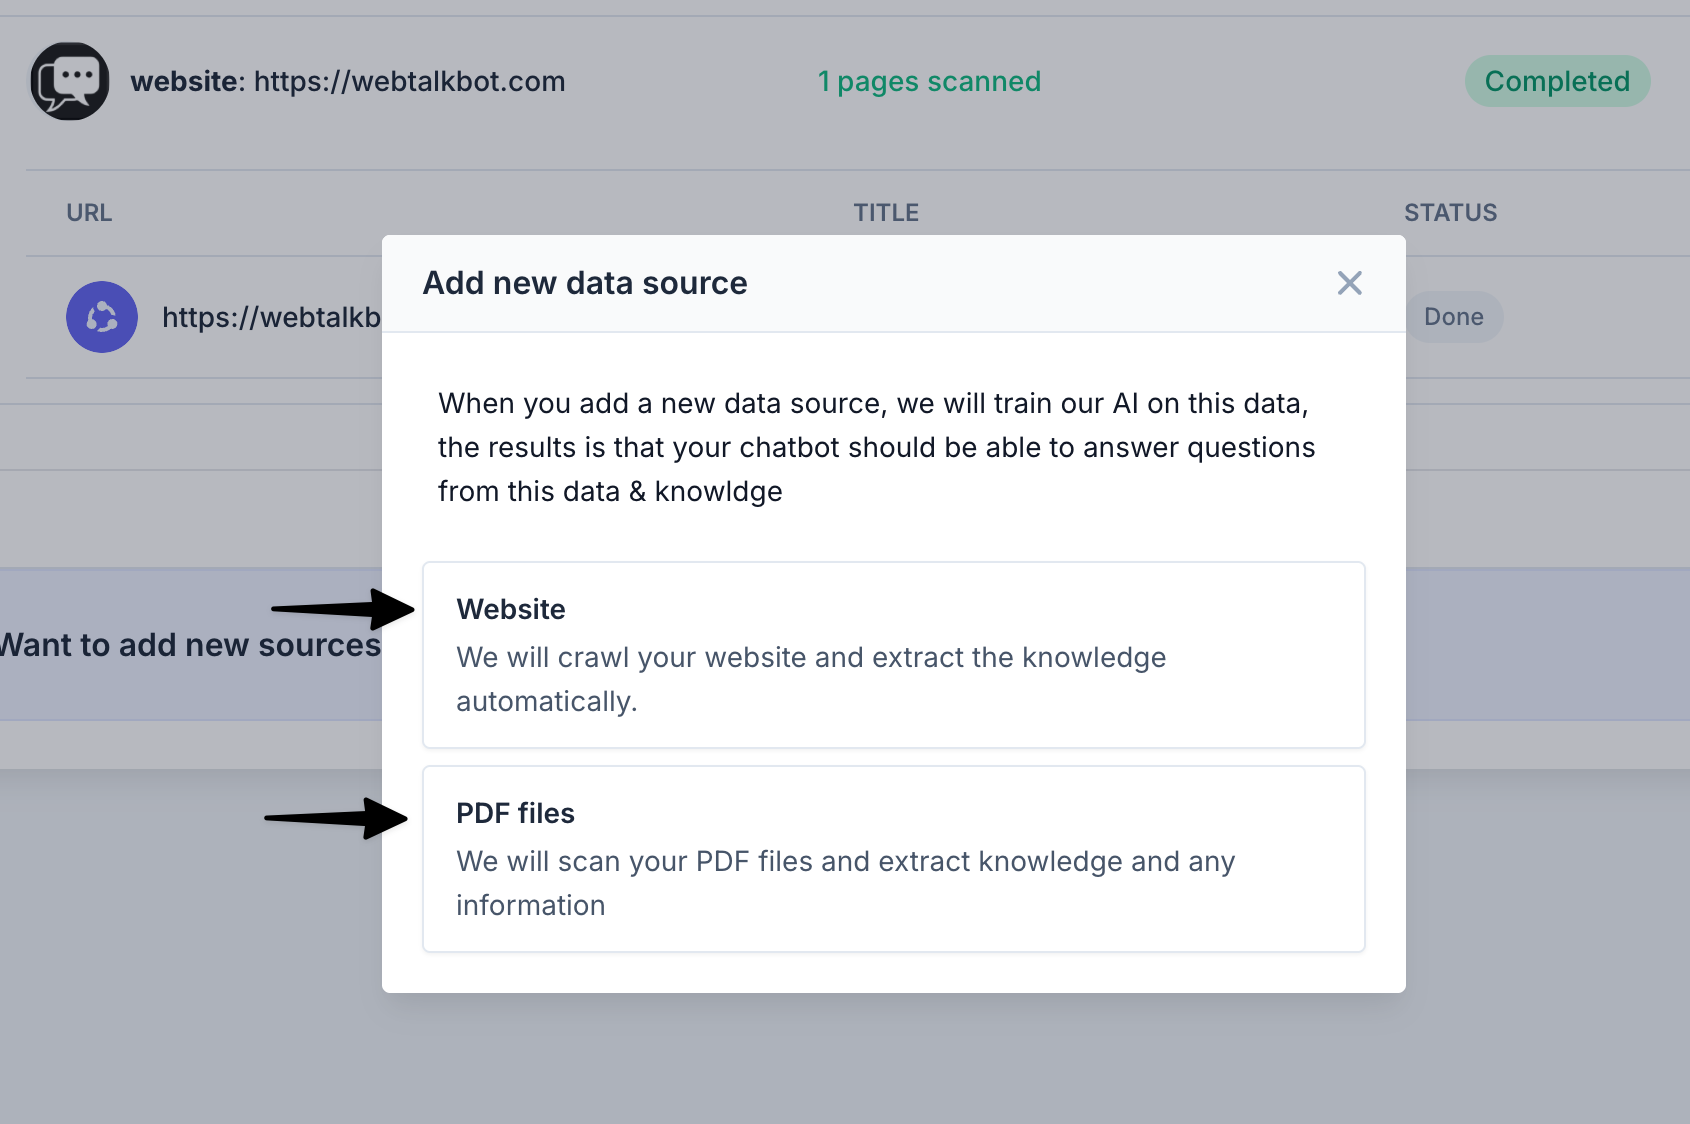
A pop-up window will appear with two options:
Website: The system will crawl the specified website and extract knowledge automatically.
PDF Files: The system will scan your uploaded PDF files and extract knowledge and information.
Choose the type of data source you want to add by clicking on the corresponding option.
Proceed with Adding Data:
After selecting the data source type, you will be prompted to provide the necessary details (e.g., a URL for a website or uploading a PDF file).
When setting up your chatbot, you have the option to choose the Chatbot Style, which affects how data can be managed:

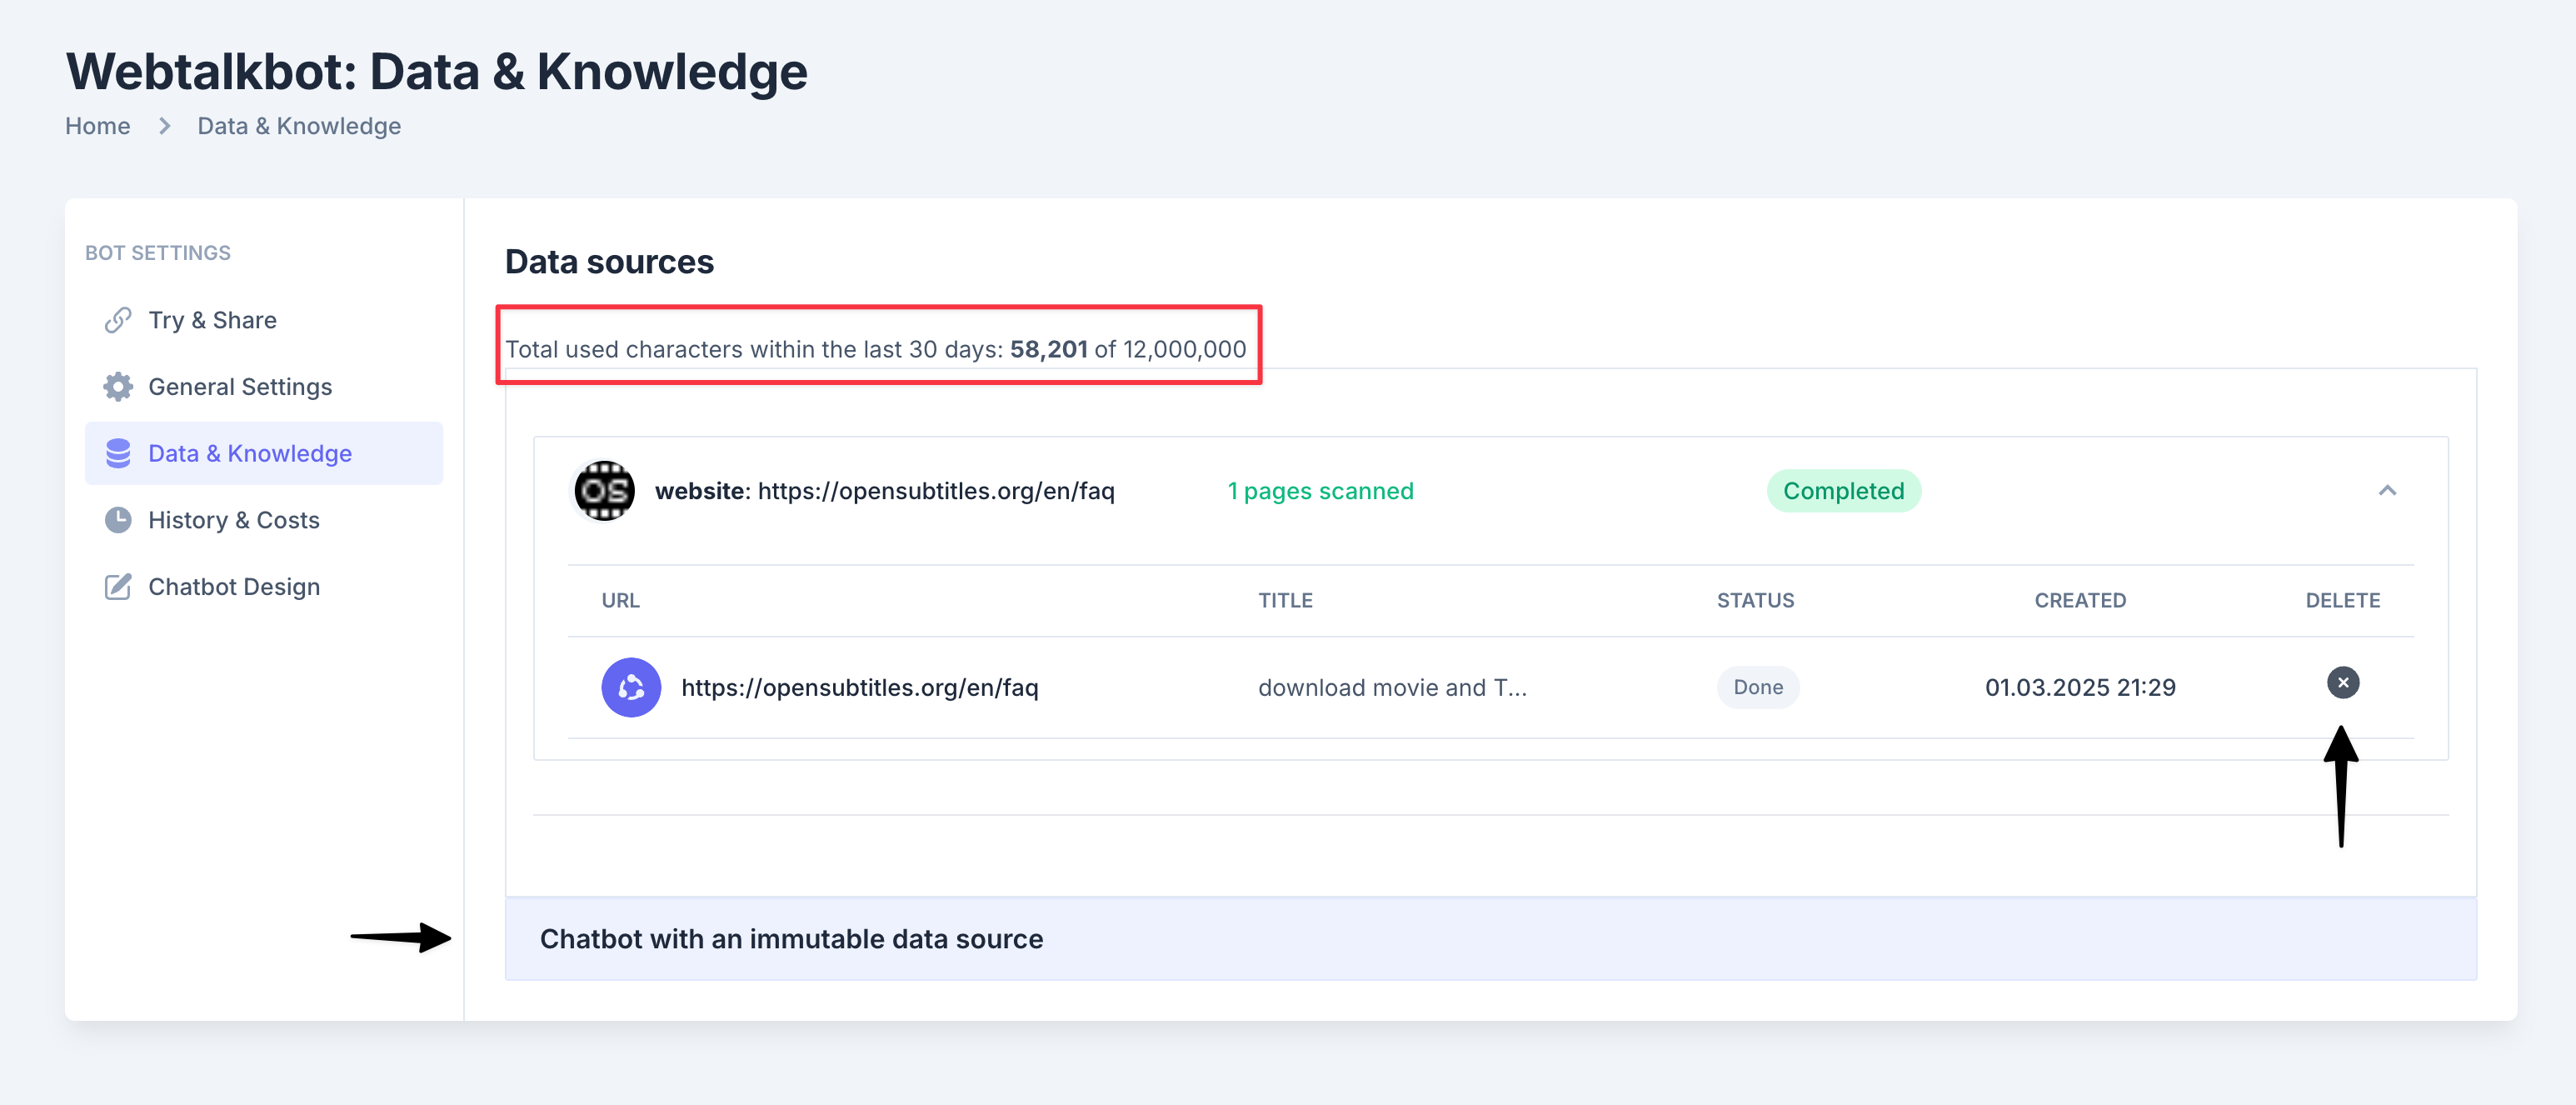
If the Delete Icon is Red:
- A red delete icon (X) with a white "X" indicates that you can delete the data source.
Click the red "X" to remove the data source. This is only possible if your chatbot is not set to an immutable data source.
If the Delete Icon is Gray:
- A gray delete icon (X) with a white "X" indicates that the data source cannot be deleted.
This happens when your chatbot is configured with an immutable data source (i.e., the "Longer documents precision support" option was selected during setup).
History & Costs
The History & Costs section in Webtalkbot allows you to view and manage the conversation history between your chatbot and users. It also provides an overview of your credit usage, helping you track how many credits you’ve used and how many are still available.
The conversation history provides a detailed overview of your chatbot’s interactions and credit usage:
Key Information Displayed:
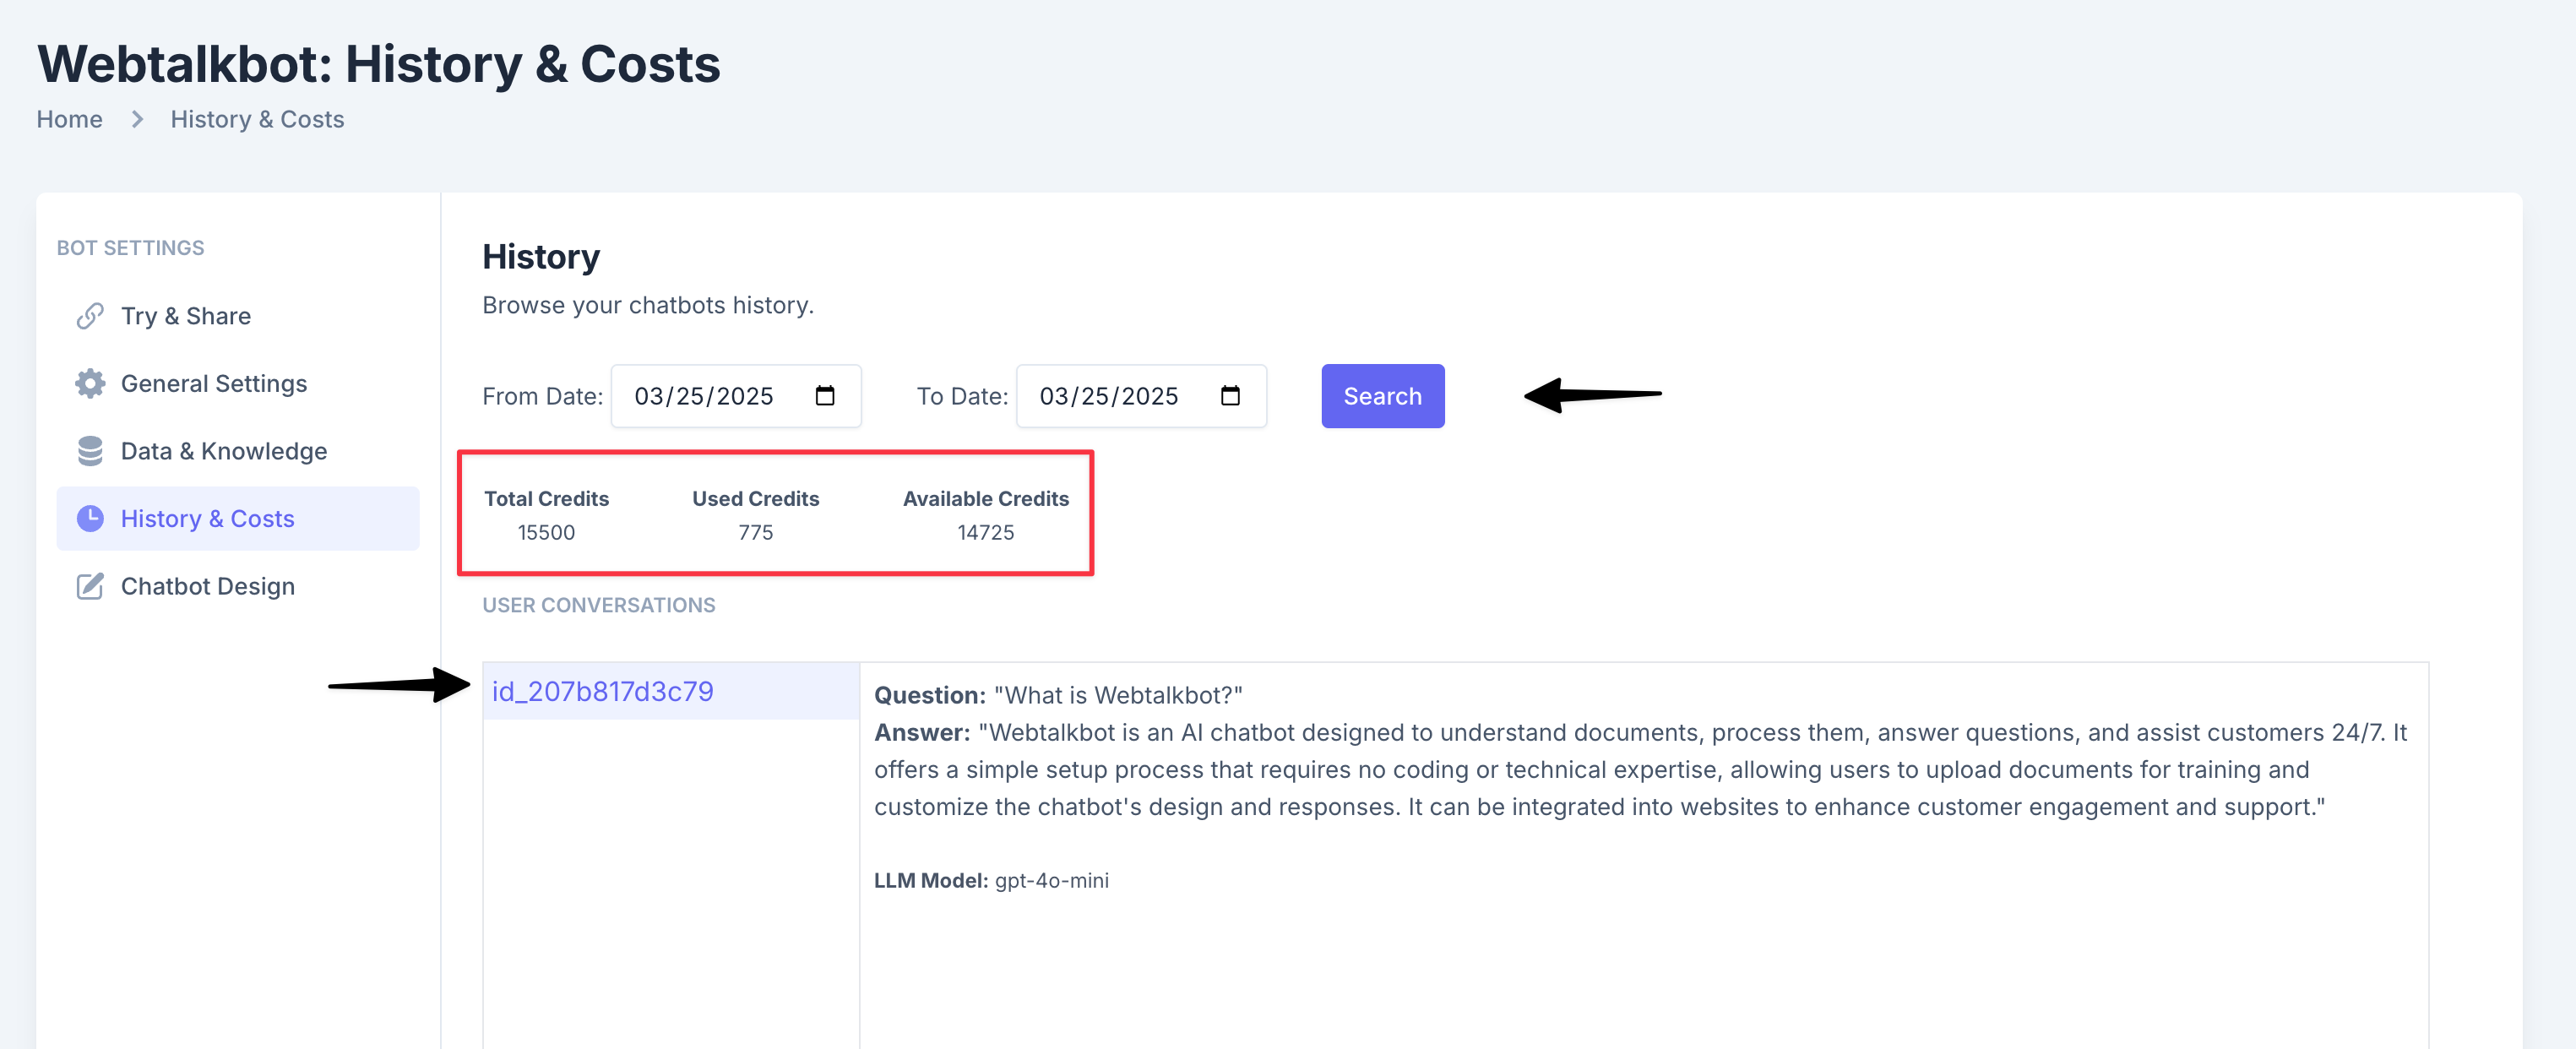
Date Range Filter:
You can filter the conversation history by selecting a date range using the "From Date" and "To Date" fields.
Example: "From Date: 03/25/2025" to "To Date: 03/25/2025".
Credit Usage:
- Total Credits: The total number of credits allocated to your account (e.g., 15,000).
- Used Credits: The number of credits you’ve consumed (e.g., 775).
- Available Credits: The remaining credits you can use (e.g., 14,225).
User Conversations:
A list of user interactions with the chatbot, including:
- ID: A unique identifier for each conversation (e.g., "id_207b817d3c79").
- Question: The user’s question (e.g., "What is Webtalkbot?").
- Answer: The chatbot’s response (e.g., "Webtalkbot is an AI chatbot designed to...").
- LLM Model: The language model used to generate the response (e.g., "gpt-40-mini").
Action Buttons:
- Delete ALL History: A red button to delete all conversation history.
- Export History: A blue button to export the conversation history. This overview helps you track your chatbot’s performance, manage credit usage, and review user interactions effectively.
You can view and search your chatbot’s conversation history to analyze user interactions and track performance:
Viewing Conversation History
- Navigate to History & Costs
From the Webtalkbot dashboard, go to Home > History & Costs. - Browse Conversations
The "User Conversations" section displays a list of interactions between users and your chatbot.
Each entry includes the conversation ID, the user’s question, the chatbot’s answer, and the language model used.
Searching Conversation History
- Set a Date Range
Use the "From Date" and "To Date" fields to specify the time period for which you want to view conversation history.
Example: To view conversations from March 25, 2025, set both "From Date" and "To Date" to "03/25/2025". - Initiate the Search
Click the Search button (highlighted in blue) to filter the conversation history based on the selected date range.
The "User Conversations" list will update to show only the conversations that occurred within the specified dates.
The History & Costs section provides a breakdown of your credit usage, which is essential for managing your Webtalkbot account:
History & Costs Section
- Total Credits
This is the total number of credits allocated to your account. Credits are used for various actions, such as processing data sources, generating responses, and other chatbot activities.
- Used Credits
This shows how many credits you’ve consumed so far.
Example: "775" used credits.
- Available Credits
This is the number of credits you have left to use, calculated as Total Credits - Used Credits.
Example: "14,225" available credits (15,000 - 775).
Monitoring Credit Usage
- Keep an eye on your available credits to ensure you don’t run out. If your available credits are low, you may need to purchase additional credits or optimize your chatbot’s usage (e.g., by reducing the frequency of data processing or limiting the number of responses).
- Credits are typically consumed when:
- Generating responses to user questions according to the used large language model
- Credit consumption depends on the selected LLM for generating responses
- Credits can be purchased at any time in the Webtalkbot administrator interface (My Account) if the user has purchased a Standard or Premium subscription
You can export or delete your chatbot’s conversation history to manage records and maintain your account:
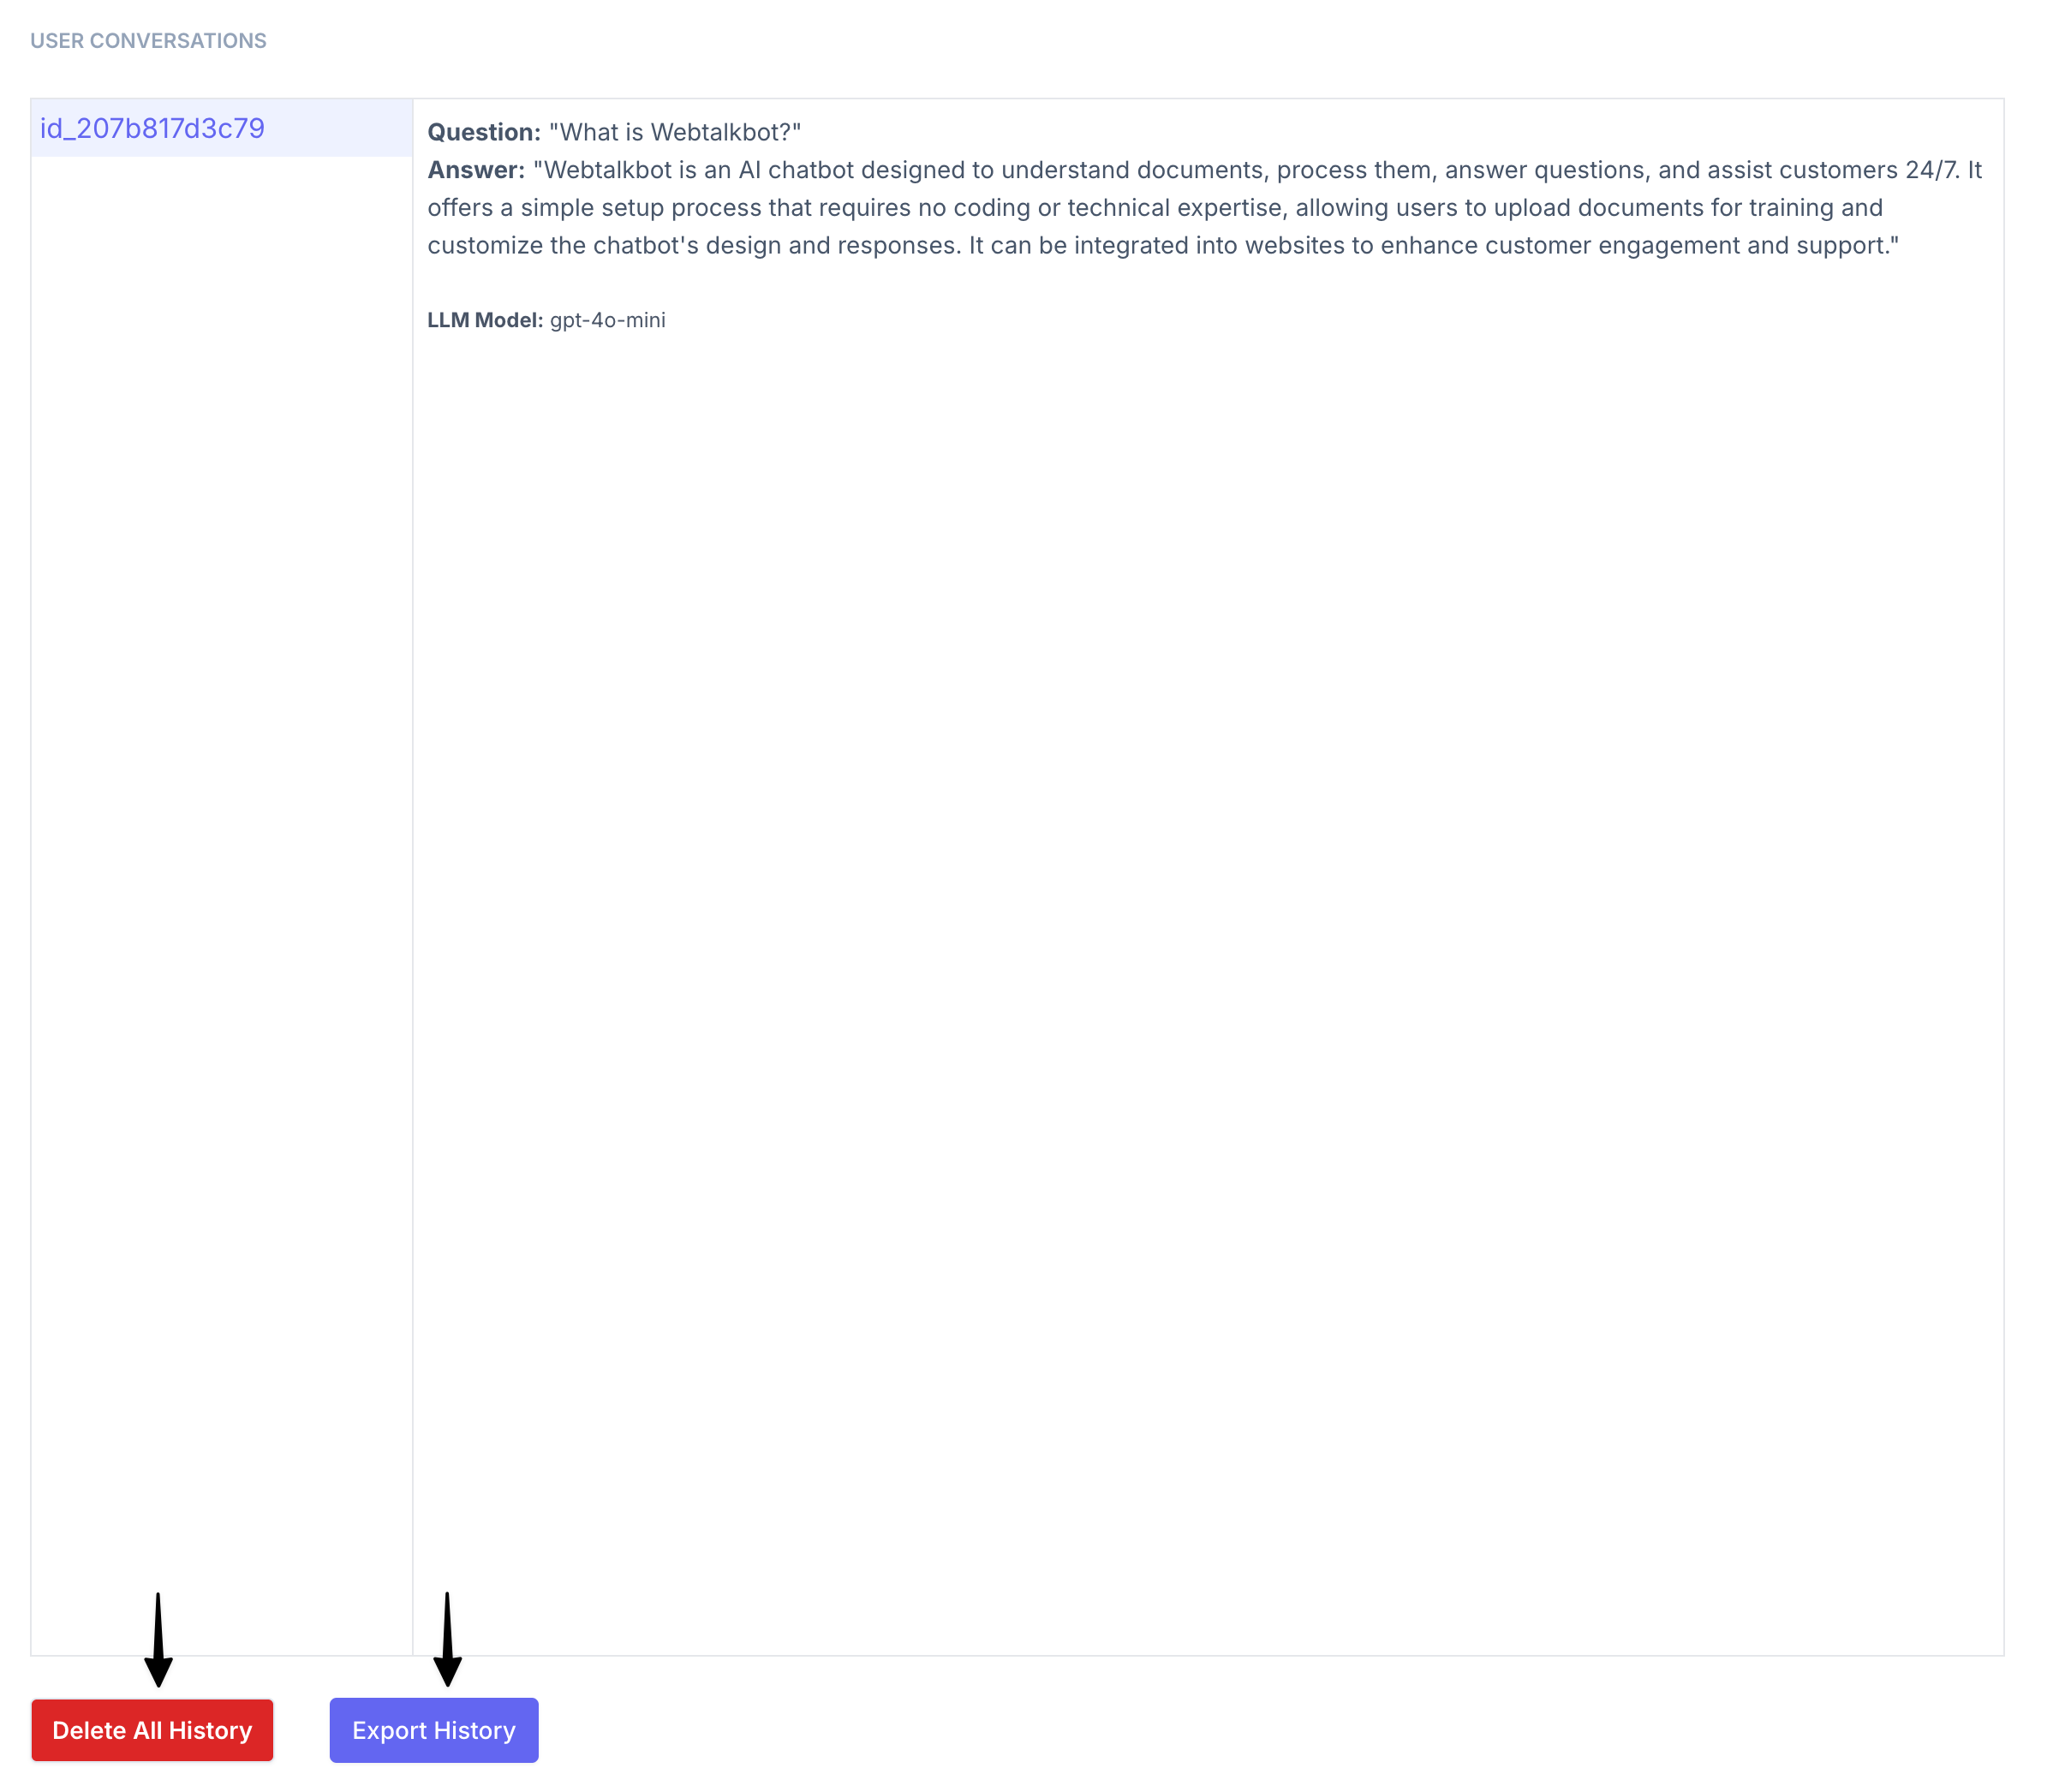
Exporting Conversation History
- Locate the Export ButtonAt the bottom of the "User Conversations" section, find the Export History button (highlighted in blue).
- Export the HistoryClick the Export History button to download a file containing your chatbot’s conversation history.
The exported file will include details such as the conversation ID, user questions, chatbot answers, and the language model used.
This feature is useful for keeping a record of interactions, analyzing user behavior, or auditing the chatbot’s performance.
Deleting Conversation History
- Delete Individual ConversationsCurrently, the interface does not show an option to delete individual conversations. You can only delete all history at once (see below).If you need to delete specific conversations, you may need to contact Webtalkbot support for assistance.
- Delete All HistoryAt the bottom of the "User Conversations" section, find the Delete ALL History button (highlighted in red).
Click the Delete ALL History button to permanently remove all conversation history from your account.
Warning: This action cannot be undone. Ensure you have exported your history (if needed) before proceeding with deletion.
Chatbot Design
The "Chatbot Design" section allows you to personalize the look and feel of your chatbot:
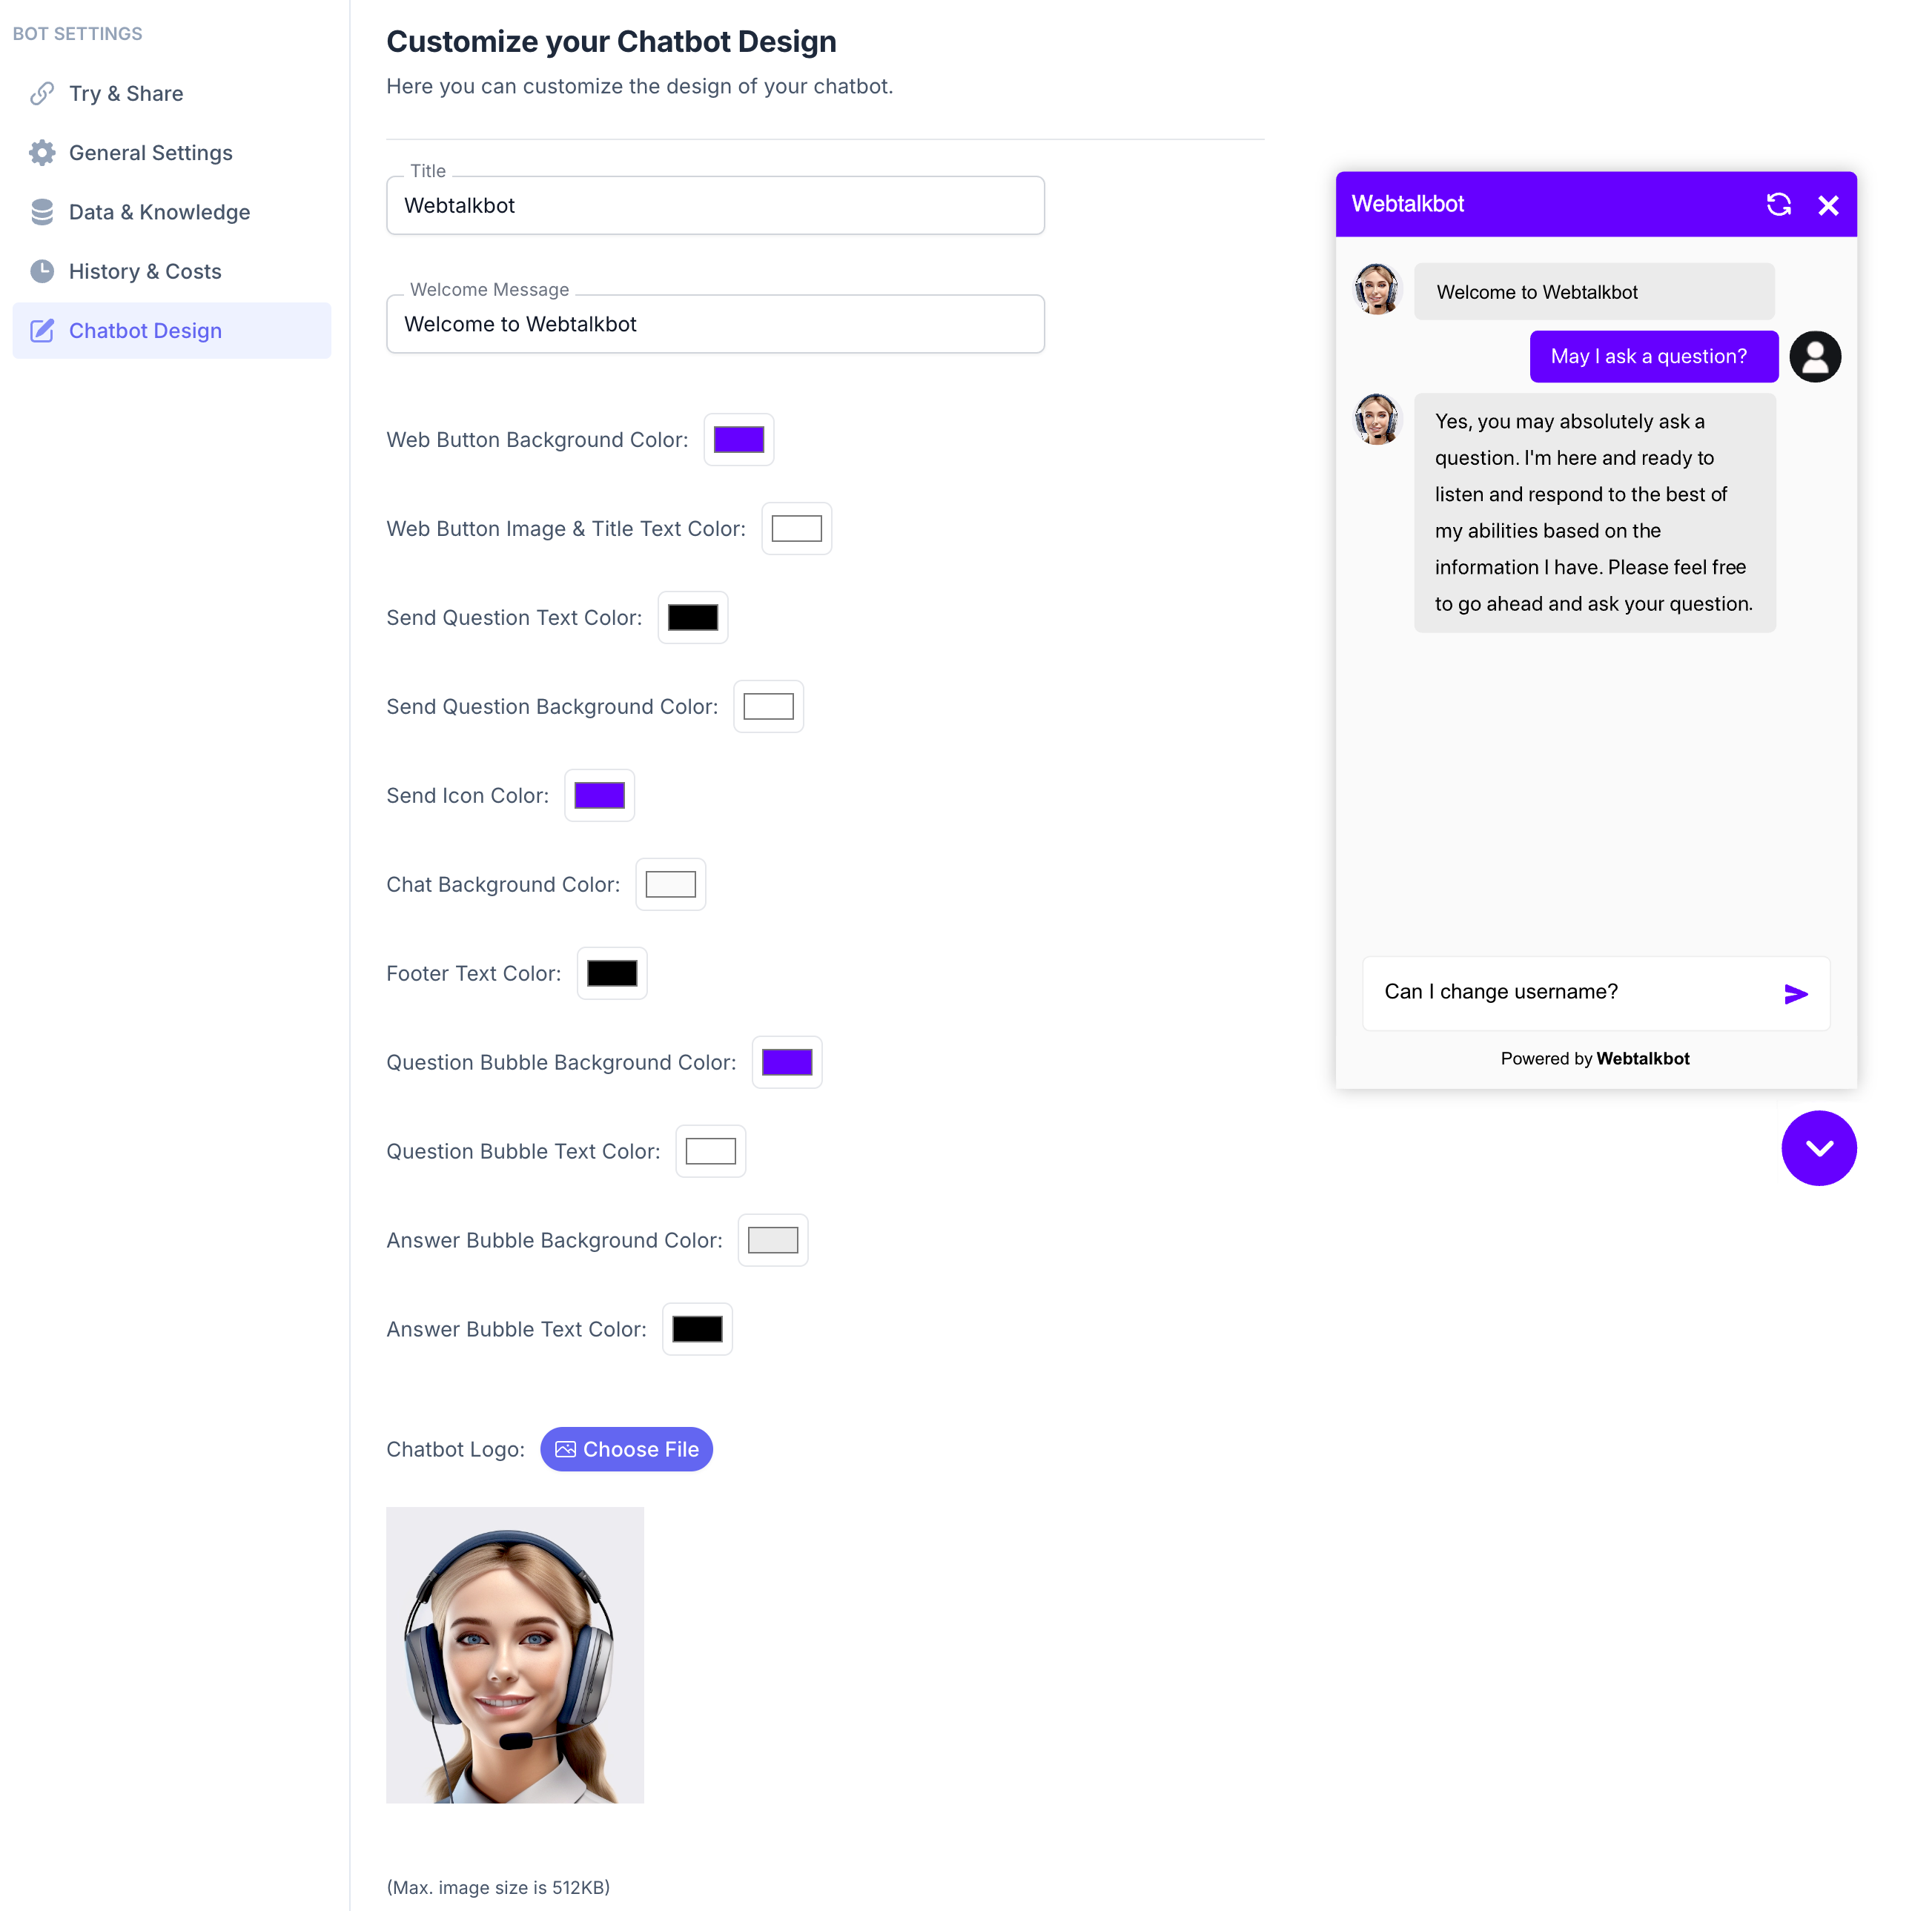
Chatbot Design Settings
Title
Field Label: Title
Default Value: "Webtalkbot"
Description: This is the name of your chatbot, displayed at the top of the chatbot window.
Example Use Case: Change this to your brand name, such as "SupportBot," to align with your company identity.
Welcome Message
Field Label: Welcome Message
Default Value: "Welcome to Webtalkbot"
Description: This message appears as the first message in the chat when a user opens the chatbot. It sets the tone for the conversation.
Example Use Case: Customize this to something more engaging, like "Hello! I’m here to help with your questions. What’s on your mind?"
Color and Design Settings
You can customize various color elements of the chatbot to match your brand. Each setting includes a color picker to select your desired color:
Web Button Background Color: The background color of the chatbot button on your website (default: purple).
Web Button Image & Title Text Color: The color of the text or icon on the chatbot button (default: white).
Send Question Text Color: The color of the text users type in the input box (default: black).
Send Question Background Color: The background color of the input box (default: white).
Send Icon Color: The color of the send button/icon (default: purple).
Chat Background Color: The background color of the entire chat window (default: white).
Footer Text Color: The color of the footer text, including the privacy policy text (default: black).
Question Bubble Background Color: The background color of the user’s question bubbles (default: purple).
Question Bubble Text Color: The color of the text in the user’s question bubbles (default: white).
Answer Bubble Background Color: The background color of the chatbot’s answer bubbles (default: light gray).
Answer Bubble Text Color: The color of the text in the chatbot’s answer bubbles (default: black).
Example Use Case: If your brand colors are blue and white, you can set the Web Button Background Color to blue, the Question Bubble Background Color to a lighter blue, and the Answer Bubble Background Color to white.
Chatbot Logo
Field Label: Chatbot Logo
Default Value: A default avatar (e.g., a person with a headset)
Description: This is the logo or avatar that appears next to the chatbot’s messages. You can upload a custom image by clicking "Choose File."
File Size Limit: Maximum image size is 512KB.
Example Use Case: Upload your company logo or a custom avatar that reflects your brand’s personality.
The chatbot footer appears at the bottom of the chatbot window and includes important information such as privacy policy links and branding:
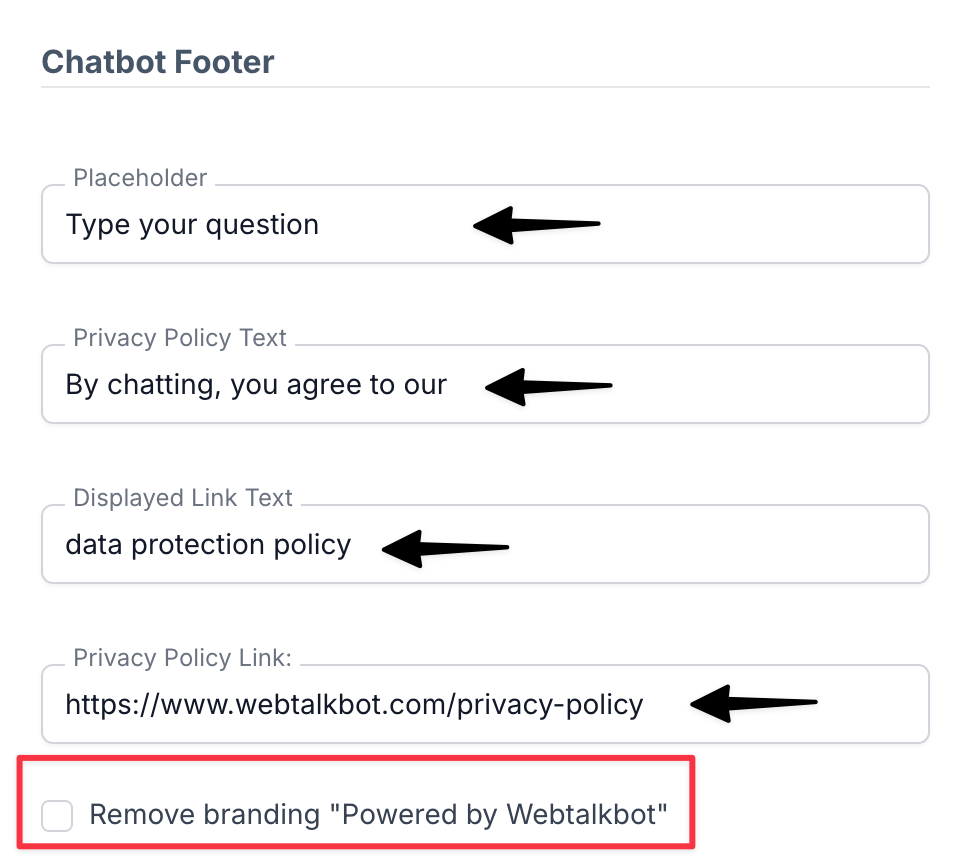
Chatbot Footer Settings:
You can customize the footer using the following fields:
Placeholder Text:
Field Label: Placeholder
Default Value: "Type your question"
Description: This text appears in the input box where users type their questions. It serves as a prompt to guide users on what to do.
Example Use Case: Change this to something more specific like "Ask about our products" to guide users toward a particular topic.
Privacy Policy Text:
Field Label: Privacy Policy Text
Default Value: "By chatting, you agree to our"
Description: This text appears before the clickable privacy policy link in the footer. It informs users that by using the chatbot, they agree to your terms.
Example Use Case: You can modify this to "By using this chatbot, you accept our" for a more formal tone.
Displayed Link Text:
Field Label: Displayed Link Text
Default Value: "data protection policy"
Description: This is the clickable text that links to your privacy policy. It appears after the Privacy Policy Text.
Example Use Case: If your policy is named differently, you can change this to "terms of service" or "privacy statement."
Privacy Policy Link:
Field Label: Privacy Policy Link
Default Value: "https://www.webtalkbot.com/privacy-policy"
Description: This is the URL that the Displayed Link Text will redirect to when clicked. Ensure this links to your actual privacy policy page.
Example Use Case: Replace the default URL with the link to your website’s privacy policy, such as "https://yourwebsite.com/privacy."
Removing Branding (only for Premium subscription):
Field Label: Remove branding "Powered by Webtalkbot"
Default Value: Unchecked (branding is visible)
Description: By default, the chatbot footer includes a "Powered by Webtalkbot" branding message. Check this box to remove the branding.
Example Use Case: If you want a white-label chatbot without any Webtalkbot branding, enable this option.
